


Independent Practice
- Taylor H
- Nov 24, 2020
- 75 min read

Updated: Jan 12, 2021
I was (and still am) very excited about this project when I was introduced to it, because it allows me to focus on things that I am interested in, and gives me free reign to make whatever I want. It also piqued my interest because we were asked to submit research, development reports, and preparatory work rather than a fully resolved thing. This is quite different than what I am used to, but I think it will be good because it turns the research and preparatory work into the final pieces, allowing me to zone in on the finer things and making complete pieces as "tests". I think that I will still work towards a completed piece, even if I finish it after it is due. I just think it would be more satisfying to have the finished thing rather than just plans for what it could be.
I D E A S
The first idea that I thought of for this project comes from a 40-minute video on how to make your own hologram. The entire video is brilliant to watch and the end product that the dude comes out with is incredible. I watched this video a couple of years ago and I've wanted to make one ever since. I feel like this might be a cool thing to try.
The other idea was to make a playable experience on the computer. I can make 3D models and texture them using photographs I take. There are concepts of post-photography and internet art in this idea, and I'd like to explore different ways of presenting work, specifically over the internet.
I think that personally, I like the idea of the playable experience, just because the hologram seems quite one dimensional, but the other idea seems a lot more colourful and I think I will be able to go down many more avenues of interest than just making one final piece. I feel that it would have been better suited to the experimental practices unit last year, but for a project-based around research and prep work, something that has a lot more opportunities for those things would be better. Plus, I think that I can relate this with my dissertation as well.
I think that I want to keep the area of interest of this project parallel to the dissertation I'm writing alongside it. Not only do the ideas fascinate me, but it will be easier for me in my head to focus on one thing. Long story short, I want my dissertation to be about nostalgia for aesthetics, post-internet and internet art, and how people respond to it in photography. I've been enjoying reading about all these topics and seeing how they all link together.
A P L A Y A B L E E X P E R I E N C E
Recently, I have seen a lot of indie games that have been released that try to emulate the effects of PS1 and N64 graphics and textures. I was interested in this of course because I loved playing games on those systems as a kid, and I still do to this day. The games even go as far as to emulate the shortcomings of the graphics processors and also taking the same shortcuts that developers had to take to make sure the game could fit on the system. I would say that this is entirely powered by nostalgia. Not for anything specific in the game, but for the aesthetic that the game presents. Since I have been looking into this idea intently for a while now, I connected the dots in my head and I wanted to respond to it somehow.


Screenshots from "No One Lives Under The Light" on Steam: https://store.steampowered.com/app/1254370/No_one_lives_under_the_lighthouse/


Screenshots from "The Red Planet" on Itch.io:


Screenshots from "Ooer" on Itch.io:


Screenshots from "Beneath a Withering Moon" on Itch.io:
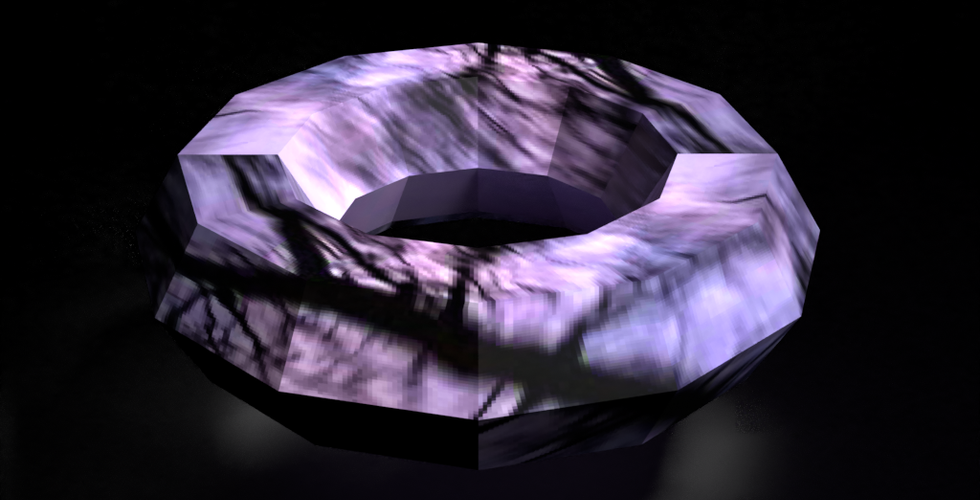
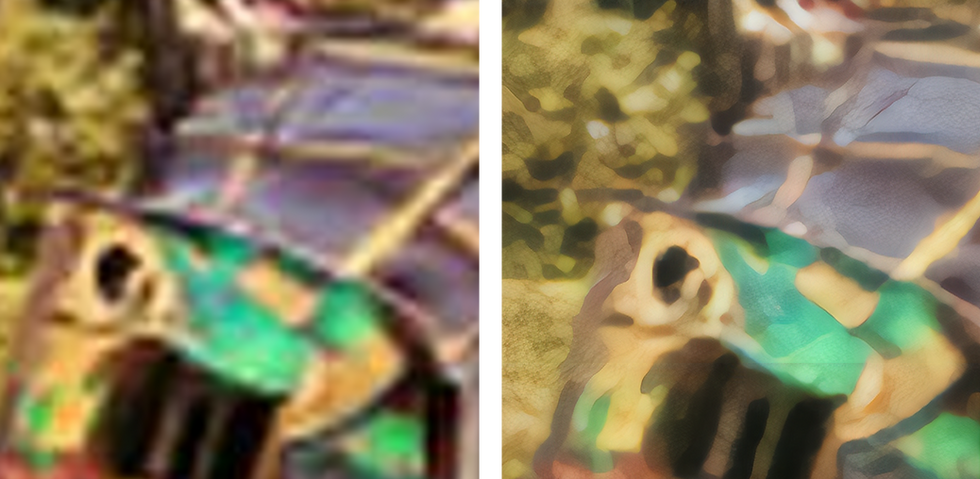
The way that I want to relate it to photography is to take photographs and use them as textures, the idea for which came from research I had done into Post-Photography. I specifically looked into Emanuel Rossetti's series of donuts that have been textured with photographs of stone surfaces. The work isn't about the images anymore, the work is about the fact that they have been transformed into a different shape. It's a great project, and I think that using this for inspiration alongside the PS1 aesthetics and having the objects be interactive in the experience adds a whole new dimension to it.


Emanuel Rosetti's Donuts
Since the textures in PS1 and N64 games are low resolution and pixelated, I plan to use primitive digital cameras from the early 2000s to take the images. I use these cameras for the same reason that the game developers decided to make their game like a PS1, it's that sweet nostalgia. I like shooting with them because I enjoy the imperfections, how their compression algorithms and the colour processors work, and how it reminds me of what photos used to look like. Growing up with the internet, I was exposed to a lot of images on image sharing sites, and all of the photographs were taken with these early digital cameras. Something is appealing about it to me, and I've found that I can be expressive with the low-resolution look that they provide.
Someone who is a great example of this is a YouTube channel by the name of Lazy Game Reviews. Clint Basinger, the guy who runs the channel talks about old technology and stuff from the 1980s to the early 200s. He reviews video games like Lego Island, Black and White, and Cross Country Canada, to name a few. He also talks about software, like this photo editing funware from the 90s. Another interesting topic he covers is old hardware, like old monitors, building custom Windows XP PCs, or old computers. There are many other different things he reviews too, but it seems that these three topics are his main area of interest. My favourite group of videos he’s done however is where he talks about old digital cameras. The videos would go into depth about the specific camera’s history, and how well they held up over the years. He will also showcase photographs that he takes with them, sometimes linking them in the video description. A lot of times these cameras aren’t easy to use. This isn’t an issue for him however, when he spoke on the topic of how terrible the nick click camera is he said “With the Nick Click it’s sow low res and awful that it’s kind of an exercise in futility. The sheer unpredictability of each resulting shot makes this curiously enjoyable to use though, with everything being a complete crap-shoot as to how it will look; from exposure, to focusing, to white balance, to whether or not you can line anything up with its absolutely awful viewfinder”. I agree with him here, as it sort of invokes a difficult process, which is the same reason that I enjoy film photography and printing; how it’s all a thoughtful process and a lot of it is up to chance.
The cameras he uses don’t provide the clearest, traditionally “good” photographs, but this isn’t an issue for him either. On the topic of hardware failure making itself present on the images he says: “When it comes to retro photography, I don’t often reach for a camera that’s going to provide crispy, high-res reproductions of reality. If I want to do that, I use a DSLR or my phone. But, if I’m going to go retro, I often go for something that uses obsolete media, or something a little bit fallible, [*], that produces unpredictable results”.


Assorted images I've taken with old digital cameras


Images taken by Lazy Game Reviews with a Nick Click:


Images taken by Lazy Game Reviews with a Canon RC-250 Xap Shot:
Around the same time as I had the idea for a playable experience, my housemate Josh asked if I could wire him £300 for an Oculus Quest (I'd be paid back in a week, of course). I agreed since I wanted to try it out as well. Later on, I realised how stupid I would be to not take advantage of it and use it for my project. Having played a few VR games like Waltz of the Wizard and Boneworks, playing around with objects with a VR headset on feels completely different to just waving it around with a mouse. It obviously doesn't literally feel like you're holding it but there is a cognitive thing where it still feels like you are the one moving it around and launching it into the distance. I feel like this addition might not be too difficult to implement (the internet is home to many tutorials), and it will add an extra layer of immersion that would not be there otherwise. It also amplifies the post-photography idea because you feel as if you are interacting with my photographs personally.
Another idea that I had that might take the experience to the next level is having a camera that you can take your own photographs with. This would be amazing for my project because then it is letting the audience take my images and re-purpose and re-appropriate them to their heart's content. Then not only is the experience about my images, but it's also about creating your own. This also plays into the idea of image sharing over the internet, and it also toys at ideas of photographing exhibition spaces and the materiality of objects (real or fake). The camera will output the shots into a folder that you can view and share around at your own will. I really think that this camera idea is going to be the cherry on the cake so to speak, and it would be really great if I manage to get it working.
I found an asset pack for Unity that lets me achieve the same look as a PS1 game. If you watch the videos below, you'll see the length the developers went through to make everything look "worse". It's kind of perfect, and I'm sure that the devs that are making PS1 type games are using this exact pack. I am fully aware that this Nostalgia For Aesthetics thing could be a red herring, as it doesn't exactly fit with the "illusion of reality" idea that I'm going for with the VR, but I don't think it necessarily has to. I see it more as an aesthetics choice. Plus, I've mentioned before that cognitive dissonance is a huge part of VR, so things don't have to look real at all to feel real. If you give someone 5 minutes in any environment or art style, they'll adapt to their surroundings and it'll begin to feel normal. Plus, nostalgia is a huge proponent of Internet Art, which this project is heavily themed after.
The only issue with PSXEffects is that I haven't decided whether I'm going to be using Unity or Unreal Engine, and PSXEffects is only for Unity. Looking at both my options, it was difficult for me to pick which one I should use since they were both entirely new to me. But, I got some help from a few people on the Games Design course and they told me to use Unreal Engine. This is because I'm a complete beginner, and Unreal has a coding system that is visual-based, so there's no coding knowledge necessary. Plus, there's a ton of pre-made assets that come with Unreal that will allow me to achieve the things I want to with relative ease. I just hope I find a PS1 shader for Unreal Engine 4.
Another thing that I hope exists is the ability to create an in-game camera in Unreal as well, which might be a pointless worry since there's most likely someone out there that's figured it out.
I also found some asset & shader packs for Unreal that give you that sweet sweet PS1 aesthetics! They both look pretty convincing, but I want to compare to see which one I'd like to use best.
The first one I came across was called Oldskooler. It's nowhere as good as the PS1 shaders in the Unity based PSXEffects, as it has a limited amount of object rendering options. You'll see what I mean when you watch the video below. Don't get me wrong, the effects they have are very well made and they look great, but it doesn't really have what I'm looking for when compared with the aforementioned PSXEffects. There is also a price tag on this pack, with the not so measly $19.99 (£15). To be honest, when I was asked in my project proposal about things that I would need to set a budget for, shader packs would have been the last thing I would have thought of, but since they're culminations of people's hard work (and it's not like I'll only use it once) I don't mind. However, I don't think this pack is where that money will go, since again it doesn't provide the aesthetic that I'm looking for. I do like the slogan that they went with though, "Yesterday's Limitations, Today!" because it puts what I've been trying to say with what people do with nostalgia in three simple words.
Oldskooler Demonstration
The other shader pack (and the one I'm going with) Is called PSXFX. Not only is it similar to the Unity pack because of the name, but it also is breathtaking on how accurate the emulation is. Whereas the previous pack focused on the rendering of 3D objects, PSXFX goes as far as emulating dithering, draw distance, vertex snapping, near clipping, and depth errors, which are all limitations of the antiquated hardware. The fact that they programmed these pseudo-glitches so perfectly that it looks like it is running on an actual PS1 tells me that it's dripping in nostalgia. Why else would people put errors and glitches in their game on purpose? This pack is $32.72 (£24.55), which is significantly dearer than the previous pack, but since I'm certain that another pack like this doesn't exist or isn't as perfect, and since it's Christmas next week (as of writing this), I don't mind treating myself to it. Also, the person who goes by the alias "Marcis" has a tutorial on how to use it, and according to the comments on their itch.io site he has a discord that you can join if you need any help with it, and apparently, he's they're super kind and helpful. Sounds like I couldn't have found a better situation here.
PSXFX Showcase
I N T E R N E T & P O S T - I N T E R N E T A R T
I've been interested in these sub-cultures of art for as long as I can remember. They're art movements that are both completely drenched in memories of a culture that I grew up in - late 90s to early 2000s internet culture. As similar as they are however, it's important to distinguish the two, to see how they both operate and what they are both used for.
Internet art is a form of artwork that solely takes place online. The work is made online, and then distributed using the same thing it was created from. This is an art form that has entirely circumnavigated the need for gallery or museum spaces, respectfully spitting in the face of tradition. Many artists have used Internet art as a method of playing with the concept of the white cube gallery, presenting work in different, online ways, which are usually lauded for their interactivity since the online realm serves to include that in as many things as possible.


Assorted Examples of Internet Art
One great example is Artie Vierkaant's "Image Objects", which is paired with an essay they wrote aptly titled "The Image Object Post-Internet". (By the way, I'm aware that this is more of a Post-Internet work than an Internet Art one, but it fits perfectly with common idea that both movements share of playing with gallery/exhibition space and exploring different ways for the audience to consume the works and how that changes the perception). The work is made in Photoshop originally, where Artie makes gradients and polygons. He then UV prints them onto sheets of Dibond composite boards, and exhibits them in a traditional gallery space. He then takes photographs of these works to create an exhibition documentary, which he then alters further in Photoshop, to then go on to release the images online. He then exhibits these, and the cycle continues. This makes the work exist in two states in the exact same time, both physical object and internet-mediated image. The reproduced versions of the original work becomes equally important as the original work itself, potentially becoming the main aesthetic and overshadowing the main project overall. This work has inspired many to play with this new idea that exhibition documentation’s objectivity and representational abilities can be challenged and questioned. It seemingly turns the internet into an exhibition space itself, where the images of the art becomes the art itself, and the various image sharing websites become the blank white walls of a gallery. Artie also invites outside parties to join in, making their own changes to the exhibition photographs of the Image Objects. This anonymous collaboration is celebrated by him too, saying “the things that get me very excited are when a piece gets acted upon by someone else, instead of simply resharing”. this insinuates that the internet blurs the lines of authorship, welcoming and encouraging the creativity in other people. Through the many alterations that Artie and all other participants have made, the documentation of the work becomes just as important as the work itself.


Artie Vierkaant's Image Objects
Image Objects iOS Alternate Reality App
Post-Internet art is a little different to Internet art however, focusing on the influence that the internet has had on culture, aesthetics, design, and society itself rather than just using the internet as a muse. Internet art can be included in Post-Internet art, but not really the other way around since there can be art that pertains to the internet but wasn't necessarily created on it. A great example of a sub-culture that came about in a very post-internet way is Vaporwave. This is art that is also coated in nostalgia, with the art style's main operative function is to include signifiers of the early 90s/early 2000s internet landscape, including things like 90s Synthwave imagery, Windows 95 windows and icons, and other items generally considered "aesthetic", like Japanese text, Arizona Ice Tea, Fiji water, and Ancient Roman busts carved out of marble. Vaporwave predominantly started out as a music scene, where the music emulates the visual style it was accompanied by. The music itself consists of slowed down Jazz, RnB, and Lounge music samples from the 80s & 90s. Both the visual and musical stylings reflect the post-internet ethos very well, highlighting the internet's impact on consumerism and poking fun at capitalism all while looking totally aesthetic, dude.


Assorted Examples of Vaporwave Art
Both of these art movements also allow and in some cases encourages image appropriation as an art. It's a little contentious whether appropriation is a valid art form since one artist can submit someone else's work with little to no alterations, but I personally think that it's ripe for artistic potential, since changing the context surrounding an image can change the perception of it entirely, which makes it a different piece of work entirely. One example that I can think of is work from an artist called Katja Novitskova. She takes vapid images she finds on the internet and transforms them into cardboard cutouts. She then photographs them, making her work here quite similar too Vierkaant's work. She documents these cutouts in a specific way, which transforms the images entirely. She shoots the cutouts straight on, which removes the notion of space and parralax, making the images appear as if they are pasted on top of the background. This calls the objectivity of the work into question, making the work less about being found photographs or being cardboard cutouts in an exhibition space, and more about how the link between photo and physical space is removed entirely. These cutouts are themselves exhibited, and a result of this has been people posing with the objects and uploading their own images with them in. This has become an integral part of the work, using the people's self-inserting documentation of the work as marketing and as a curatorial practice.


Assorted Images by Katja Novitskova
Another artist (who happens to be a favourite of mine) that I believe to use image appropriation is Jon Rafman with his 9Eyes project. The entire idea is to use Google Streetview for Jon to go on long "walks", and the aim is to find interesting, weird, or funny situations. He then screenshots them, and presents them on his blog as a form of street photography. This is a great example of image appropriation because Jon didn't take any of the images he uses, they're all taken by the 9-lensed camera atop the Google cars. He reframes them though, which transforms the image from a utilitarian one designed to document the world into a candid street-photograph, which is inspired by sublime imagery, however he seems to only capture situations that seem funny to him.


Assorted Images from "9Eyes"
I think that Internet and Post-Internet art is an incredibly rich area that can supply me with a lot of inspiration. It is heavy with it's reliance on nostalgia too, which is a theme I aim to include. Internet and Post-Internet would not work and be as successful as it is now without my generation, without the people to look back on the time that they started out in and remember it fondly.
T R Y I N G O U T D I F F E R E N T 3 D M O D E L L I N G S O F T W A R E S
Even though my initial idea was to use Autodesk Maya right out of the gate, I wanted to try a few others just to see which one suited me and my ideas best.
ADOBE DIMENSION

The first one I tried was Adobe Dimension. Our university has extended an Adobe Creative Suite subscription to us, which includes this software. I hadn't seen or heard anything about this program before, so I was excited to try it out.
So, as it turns out, this is for taking already made 3D objects and applying textures and premade bump-maps and combining them with 2D images to create renders. I would assume that people in advertising use this the most, although I have seen examples of people making art with this program as well. I will keep this program installed because it might come in handy when I want to texture my own models.
But, saying that, I still wanted to see if I could still make something with it.
I placed in a default torus shape and slid a few sliders around to do with how many sides the torus had, and I converted it into a standard model and wrapped an image around it that I took with some old digital cameras of mine. I wanted to do a few tests this way just to see what the low-res images look like on objects, and also to give Emanuel’s donuts a nod.


When the image is placed on top of the 3D model, it places it as if it was a sticker. On the right-hand side of the screen is a menu where you can play around with the image a bit. First, I click on the drop-down menu and change Decal to Fill. This turns your image from a sticker on the shape to fully covering it. Then, you can play with how the image is offset, and how many times you can repeat it.
The first batch of tests (above) I did was with images taken with a Samsung Digimax 301. The first three weren’t as successful but after I edited them to make them 100x bigger (so that they were pixelated a bit) before making them a texture, it made a huge difference. I started to see what I was thinking in my head – a PS1 style low poly model with a low-res image as a texture.
I think that with the more complex 3D models I make, I will splice together images over the texture map so that it looks a lot more organised and like I meant for it to look a certain way.
I also tested out some images from the camera on my old Samsung Galaxy Y, with the camera whacked down to 0.1 MP. I also did some low quality renders as well, to see what it would look like. The only real difference that I can see is that it’s a little grainier. It does look cooler to me.


High Quality (Slow)


Low Quality (Fast)
BLENDER

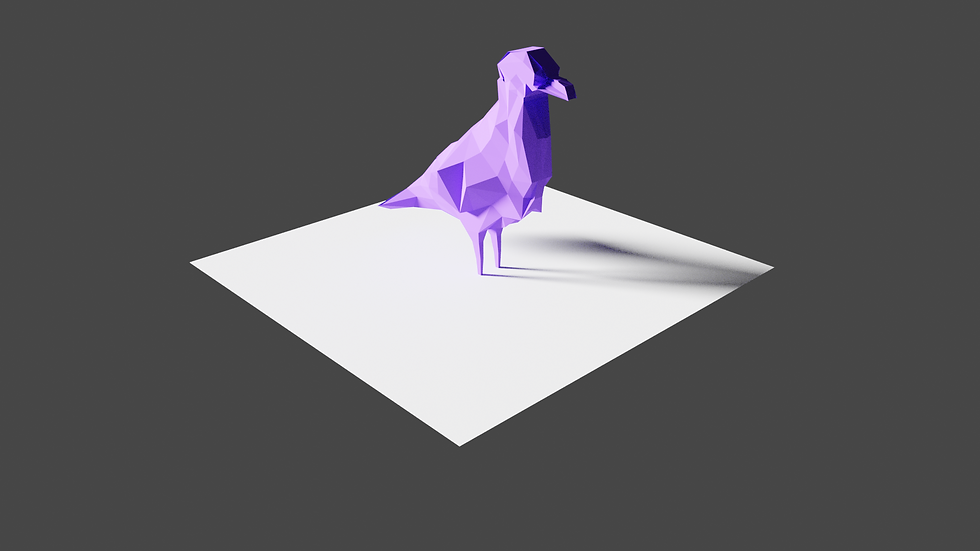
There's also a Twitter account that I've found recently that I have been enamoured with, called @lowpolyanimals. They take assorted animals from older video games and take them out of their context and curate them all on one Twitter page. This is a crazy cool mixture of nostalgia for the games and the classic image-sharing trope of the cute animals. I think I'd be interested in responding to this, by attempting to recreate some of the simplest ones.
When I opened Blender, I truly knew I was out of my element. There are cryptic icons and puzzling menus that I am hopeless in navigating. Luckily, YouTube user Grant Abbitt was at the rescue with his tutorial on how to make Low Poly Animals in Blender. Hopefully, I can get the basic idea of how to make these things in the 12 and a half minutes of the video.
After watching that video, I was genuinely surprised that I could follow along. It turns out that it was only part one of a two-part series, so I intend on watching the second straight away. Instead of using a giraffe like the guy in the tutorial, I based mine off of a stock photo of a seagull instead.


I pretty much got the gist of the second video pretty quickly, as it was just adjusting vertices and sides until you got the shape you want. As easy as the act of dragging them around was, making sure they were perfect and had no gaps were pretty difficult. Plus, I'm still getting my head around all the keyboard shortcuts.


After fumbling about and following the tutorial as best as I could, I ended up with a final render. The tutorial didn't give me a way to apply a photograph as a texture and I couldn't figure one out myself, but I'm still quite impressed and surprised at the way it came out. So far this has been the most challenging software, but that's because I had to make the 3D model myself. And yes, I didn't do the feet on purpose.
Final Render
Just because I was curious to see what the bird would look like with in image over it, I exported him as a .obj file and imported him into Adobe Dimension. I applied the texture and then imported the same image as the background. Again, with more complex models like this, I intend to be more deliberate with photo placements, making it actually resemble what it is supposed to be. This is just for testing purposes, plus I think it all looks real neat.


DUST 3D

I hadn't heard of this software before, but when I was looking up "Best 3D Modelling Softwares for Low Poly Models", there was an article singing its praise, so I decided to try it out. I found a video titled "EASILY MAKE 3D MODELS FROM SCRATCH! - WITH THIS FREE OPEN SOURCE TOOL 🤩", so hopefully by the end of it I will be just as excited.
Just from watching the first six minutes, it already seemed like it was a lot more intuitive than Blender. There are drag and droppable nodes each with settings that affect its shape, rather than extruding and shearing and hoping nothing is clipping into itself. Actually, to remedy the overlapping issue, they made vertices and sides snap to each other when objects are close, making it a full object with no gaps.
As good as it looked to use, I actually found it pretty hard navigating the 3D space in this program. I think the bare-bones-ness that it has is good, but it leaves a lot of space for confusion. I was following the tutorial and everything made sense, but nothing was really working. I attempted to make a swan, then a frog that somehow turned into a terrible dinosaur creature out to steal your family. The software comes with examples so I know that it is possible to make great animals in this software but maybe with some practice I could get there. Again, you can export it as a .obj and use it elsewhere.


I think that this manages to create a low-poly look a lot better, as if it was made for it or something. if you take a look at the images where I applied images to them, you can see that there are more chunks where images are visible, whereas, with the bird from Blender, there was a lot more stretching.


Overall, Blender gave me the best looking outcome in my opinion, but I'm not certain if that's because I got a better tutorial for it than for Dust 3D. Since Dust 3D is a lot simpler to use (despite my struggles with it), I think I will attempt to get better at both, and maybe compare once I know a little more about what I am doing. I think that Blender would be better for more complex, geometrical, and perfect shapes, but Dust 3D is for quick, dirty 3D models that you can spit out in seconds.
Again, I still haven't been able to apply textures how I wanted, by being able to squash the 3D model into its flat shape (think of it like if it was all unfolded) and apply certain photographs to specific areas so that the objects can be more cohesive. Like I could have different textures for the arms and the body for the dinosaur, add in some extra details, and just not make it look like I vinyl wrapped it with an image. From what I've seen, Autodesk Maya has that exact feature, but I'm still waiting on that confirmation of status from the uni so I can try it out.
What should I do moving forward? I think I want to focus more on the photography side of things more in the future because in the end, the models aren't supposed to be masterpieces, they're just supposed to be recognisable. I can achieve that better through the texture photographs than with the model better I think. Maybe also looking into other ways of creating 3D models could be good too.
A fun exercise could be to take a landscape or a still life, then recreate it in 3D. each model's textures are individual photographs taken of that object and mapped to its respective self in 3D, then do a side by side comparison to see how well you've done. Or similarly, get some screenshots of old video games and try and recreate them in the same way. I think this exercise will help me get a little better at making 3D models, and it will start getting me to think about how I want to take these texture photos.
E X P L O R I N G A R T I F I C I A L I N T E L L I G E N C E
I've been a huge fan of image generative AIs and just AIs in general ever since I properly dove into them for my Vision + Communication project last year. The software I used was called RunwayML, and it has a huge collection of open source AI programs that you can use to your heart's content. Well, more like your wallet, since it all runs on remote servers that cost money to keep running. Since everything is open source, they decided to charge for the power you use. You donate a sum of money and as you use the AIs it slowly trickles away. I think I'll invest £10 since that did me just fine when I last used it.
The software has undergone a few updates since I last booted it up, and the UI looks a lot better. There are also many new AIs in the selection for me to mess around with. I scrolled through the entire list of AIs they had on offer, and I singled some out that I think relates to my ideas.
BigBiGAN
The first one I wanted to check out was BigBiGan. I used it in Vision + Communication to create a Lovecraftian looking self-portrait series, and the way it spits out your image after it's chewed it up is incredibly fascinating to me. If you'd like to learn about how it works, you can read my best understanding of it on the blog post I did for it. Or, if you want to read the writing of someone who knows what they're talking about, Google it.
I mainly wanted to see if they had updated BigBiGan in any way, but by doing tests it seems like the outputs are very similar to the ones I got before. The only difference I noticed was how fast it is now compared to when I used it last. I used some images from a previous shoot using an old DVR camera and this is what I got:


The photographs before being put through the AI...


Their Respective Results.
As you can see, the image it spits out is super low res (256x256 px), which isn't a problem with what I'm doing, but there is another AI I used last year called Image-Super-Resolution, and it's still available. It's an upscaling AI, so it takes lower resolution images and attempts to make them higher res. With a normal photograph it looks pretty normal, but with such a tiny image, the upscaling results in a weird, painterly, leathery texture that looks fairly interesting. I don't think that the look would fit in with the objects though, so I might skip on it.
I can only really think of one thing I could use BigBiGAN for moving forward - running texture photographs through it to get variations of the same thing. This way, I could turn Blue_Metal.png into Blue_Metal 1 through 100 if I wanted. Or, since the images it comes out with are square, I could turn them into repeating textures for water, ground. sky, whatever. I might have to edit them to make sure they tile satisfyingly but that should be manageable.
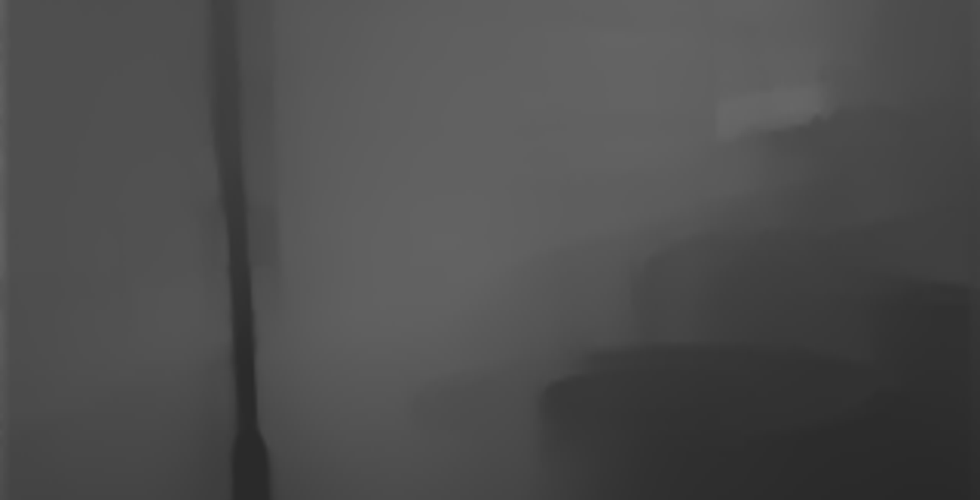
MidaS & DenseDepth
These AIs are all about trying to calculate depth. You put in an image, and it turns it into an eerie black and white image where the closer something is, the brighter it is. I think that this could be useful because I could use the outcomes as bump-maps over the surface of a 3D shape. For example, I take a photo of a concrete path and run that through one of these AIs, then texture the 3D object with the photograph, then apply the bump-map over the top.
The first one I tried was MidaS. I was expecting to see a bigger level of detail, but the examples they gave were of still-life scenes and interiors and I put in architectural shots so I might have been stressing it out there. Plus the images aren't the highest resolution so some information might be getting lost there.


Images Before


Images after MidaS
It looks a lot like the negatives of a poorly made pinhole camera, which is quite endearing because I love making those.
After MidaS, I was interested to see whether DenseDepth was any different. I was quite surprised to find that it was. It seems to have a better time with detail, and it's also inverse colours to the previous one, making it look like a positive from a very primitive camera.


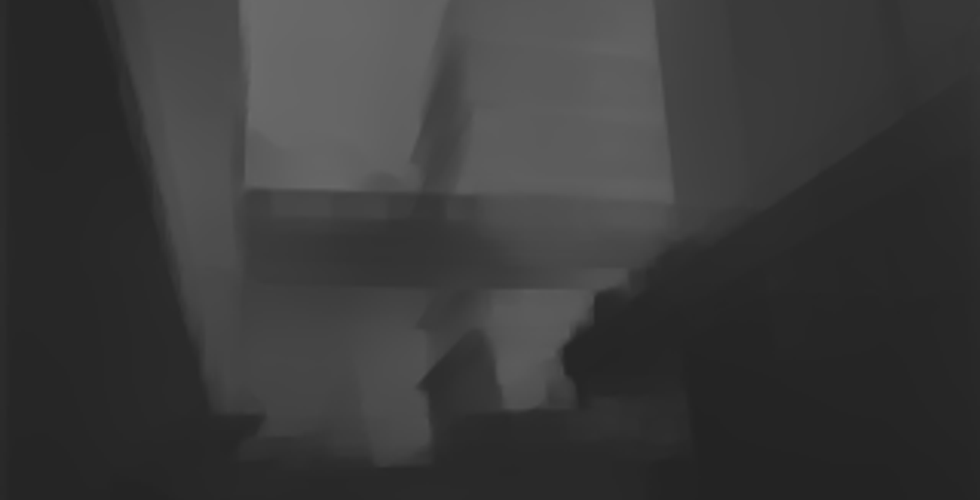


Images after DenseDepth
I really like these images, even if they were just simple tests they are very sinister and spectral. Just for fun, I brought the images from both AIs and combined them in Photoshop by bringing them together as layers and set the blend mode to Difference. I like these a lot more from an artistic standpoint, the contrast is more dramatic and makes depth more visible too. They also look like they've been solarised.
Speaking of, I hit Solarise on them just because. It took the brightest parts and turned them dark, which just adds to the hauntingness of the images.


Again, I'm not going to use them as textures, but we can appreciate them as bump-maps behind the scenes.
Colorful-Clouds
From here, I ran out of AIs that take images and give you another, the rest are just AIs that generate their own. I found this one called Colorful-Clouds, which just generates an image of some clouds. I was thinking about using them as atmosphere, there are tricks to make realistic looking clouds with just an image in game-making software, and there's most likely a tutorial somewhere to do with it.


So those images weren't as I was expecting, The database that the AI draws from is of photographs of clouds, so it's creating its own based on them. They don't really look like I could use them for skyboxes or even that trick I mentioned earlier. They do look pretty though.
Brutalism_Generator
This AI is like Colourful Clouds, except instead of being trained on clouds, it's trained on photographs of Brutalist architecture. I really enjoy this kind of architecture, so I was drawn to it. Plus, I could use a similar method for how I made my seagull with these, I could bring the randomly generated Brutalist building into Blender and create a 3D model based on it. That way I could create outdoor and metropolitan areas in the VR experience.


These look pretty cool, They resemble 1940's black and white photography because of the colours and the overall quality of the image, and the anomalies in the generation look like some otherworldly floating architecture. They also have an eerie quality to them. I think that they would be a little too difficult for me to recreate in Blender, but I might have an easier time in Maya as soon as it becomes available to me.
Textures_DTD
Textures is an AI that just seems to generate its own textures. I think this could be useful since it could save me from having a lot to shoot, or it could even inspire me to take photos of things I didn't think about before.


I am really impressed with what I saw! these textures look really great, plus some of them look quite realistic as well. To see what these looked like on 3D objects, I reopened Adobe Dimension and applied them to spheres, with the Colourful Clouds in the background.


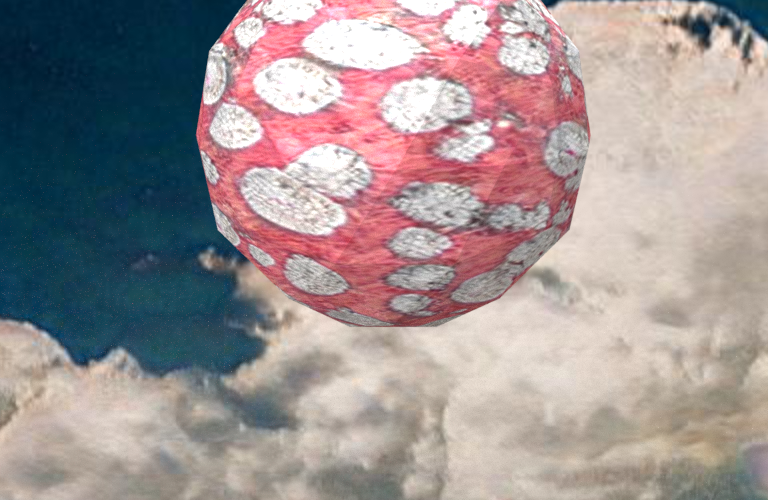


Looking at these textures mapped to a 3D model, I can now say that I would definitely use them. A few of them even pass off as photographs, which almost legitimises the strange AI-esque textures, and makes them look slightly real as well. Cool!
And that's all the AI's I tried from Runway. Either others didn't have anything to do with what I was doing (movement trackers, text-based AI) or I just wasn't interested in them (style transfer AI). I found another AI called Monster Mash which turns 2D drawings into animatable 3D objects, but there isn't a demo available at this time.
F I N D I N G D I F F E R E N T W A Y S T O C R E A T E 3 D M O D E L S
While finding Monster Mash, I was also looking up different ways of creating 3D models, just to see if there is a way I can get reliable, good looking results just by inputting images. I found one that looked promising, Selva3D. it professed to allow you to input a single image and it will generate a model for you. Sounds great, but also too good to be true at the same time. To stress-test it a little bit, I put the Brutalist Buildings that I generated earlier through it.
To start, I was asked to create an account, so begrudgingly I did. Now that they know my full name and email address, I just have to wait until they send the confirmation email so I can use it. Thanks, Selva.
I know some apps allow you to take several pictures of something in a circle and it will try and generate a 3D model out of it, so maybe I could try these. My only issue with the mobile apps is that they are very quick to say no to you. If something doesn't work then it just tells you that it failed, rather than just trying anyway and seeing what happens. I feel like computer programs would have a better time with that since their computing power is a lot higher.
VisualSFM
I found one! VisualSFM! It allows you to upload an unlimited amount of photographs and it'll just generate something for you. It was having trouble with the five images I generated before, so I went on a bit of a spree and saved a ton. Hopefully, then it'll find similarities and attempt something. So far it's just said no to me, which is disappointing. I generated 100 individual buildings, and now I run them through the program again, just to see if there are any similarities at all. Since they all look similar in some way, I am hopeful this will work.
And success! I think my issue before was that I didn't extract the program from the zip file before I ran it, but now that I have, I hit the Compute Missing Matches button, and now it's going through each combination of images to see where all the similar points are.

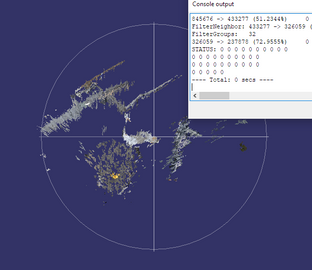
17.133 minutes later, we're done. I then click Compute 3D Reconstruction and see what happens. I was presented with a few dots on my screen. I'm not sure what these are, but I exported it anyway.

So it's just exported it as a set of points, there was no side or face information there at all. I think that it tried, but it didn't exactly work. To be fair, my biggest gripe with these programs is that they just refuse you sometimes, whereas this actually gave me something. Perhaps I should try this again, but properly rather than with AI-generated buildings.
A S K I N G M Y S E L F W H Y
After one of my tutorials, I was asked a very simple yet challenging question. Why? Why am I doing what I'm doing? At first, I thought that I didn't really have an answer and that I only wanted to do it because my housemate bought a headset recently. However, I won't get any marks for that so I had to think a bit more on the matter. The reason that I'd like to use VR is because of the immersion that I felt when I tried it out a few times. The simulated physics grants a strange cognitive dissonance where you know that you are in a virtual world, yet it feels as if you are manipulating the things around you yourself in real life. I feel that this trickery of fooling people into a false sense of reality opens many doors and allows me to explore certain sociological ideas as well. For example, the illusion of reality can be used to induce emotions, like creating a sense of impending doom, severe anxiety, or a gutting sadness. This is due to your perspective being mapped and ported into the game, so in a literal sense, you are being brought into the digital world, or at least, the VR headset is a window into that world. I think that VR could also combat the issue that people have when comparing seeing work in an exhibition VS online, they say that seeing the work in person is far superior because you can really get the scale/texture/colour/ etc. better. Since those are all things that can be played with in 3D software, we can create a pseudo version of that, a remedy for those who can't make it to exhibitions but really like seeing art up close. I also think that it will give the audience a much larger sense of ownership of the images that they take with the proposed in-the game camera, as it will feel like you are taking the photograph yourself.
I genuinely feel that VR is such a visceral experience, and it can be used to convey messages incredibly well. People don't need to put the effort in of having to relate to a character or a story if everything plays out from their own literal perspective.
P L A Y I N G W I T H T E X T U R E
When I was in Adobe Dimension, I found somewhere where you could place a "normal" map, and it would apply a surface texture. In photoshop, you can make these by loading your texture, click Filters > 3D > Generate Normal Map. It then shows you what it will look like once it's applied to a shape, and you can adjust the sharpness of the darks, mids, and highlights separately.
Then, in Dimension, select the Default Material of the object you want to apply the texture to, and then drag and drop it in.


To test this out, I made a few more renders of some low-poly spheres and followed all the steps above with some more textures that were generated by Textures_DTD.


The Textures


Their Respective Normal Maps
I really like the look of the normal maps, the bright colours are very appealing to me. I can assume that the difference in brightness and hue translates into different lighting information in 3D rendering software.
I generated the spheres, applied the textures, then applied their normal maps, and lined them up on the X and Y axis so that the depth and colours matched. I was really happy with the results, the textures really stand out a lot more because of the shading from the normal maps.


I think that this will be useful knowledge to have moving forward, I'm especially excited to see how the PSX shaders interact with normal maps that I make. I am also interested to see what maps come out of the photographs that I take when I do my first shoot.
T R Y I N G O U T A R ( A L T E R N A T E R E A L I T Y )
Since I'm looking at different conceptual ideas, I took a look at a different way of interacting with 3D models, Augmented Reality. I had made a strange sea creature in Dust3D, textured it and applied a Normal map to it, exported it, and loaded it into a very bare-bones AR app, called AR Viewer. What I was really impressed to see was that I could see the details of the Normal maps so clearly, seeing it in a 3D environment where I can move the camera around freely adds another layer of depth, as you tilting the camera around affects the way the light bounces off the Normal map.


Random Renders of the Sea Creature
This is a really cool idea and I'd like to continue working with AR at some point, even if it's just for a more fun way of looking at the 3D models I make. I personally think that for the end product, VR is still the way forward. With AR, you can only really view and tap on the 3D object, but in VR you have so many more options for what the player can do. Plus, looking at something through a phone and seeing it through a headset is completely different experience-wise.
S T E N C I L T E X T U R I N G
From this video, I learned a really easy way to texture objects. The way stencil texturing works is by having the texture as an overlay, that you can click and paint it on. You can also change the blend settings, so you can also use the lighter or darker parts of the texture. I found this process very easy, and I enjoyed being the painter and having full direction of where each texture goes. This process would be a ton easier than what I was planning to do. Stencil texturing uses the 3D model so you can fully visualise what the final texture will be, but I planned to use the UV map and apply the textures using Photoshop. Stenciling takes that idea and simplifies it, making it so you don't have to stare at the UV map and figure out which bit is what bit on the 3D model. I also enjoy the style that this method brings as well, some sections are different resolutions because the texture that was applied was resized, and it is further reminiscent of the PS1 3D models. Like I've said before, the cognitive dissonance that you feel in combination with the simulated physics of the game engine is enough to make someone feel like they are fully immersed, so the textures and models don't necessarily have to be too realistic. My thought is that the audience will have their disbelief suspended by having their perspectives are thrown into the world I put together.


The Process


The Textures I Used (From Textures_DTD)
The Completed UV Map


Renders of the Model
C R E A T I N G A N E N V I R O N M E N T
Since I am aiming to create an illusion of reality, I felt as if I needed to create a space that felt familiar to virtually everyone that this experience can reach. I think I should create the mundane, the boring everyday settings that a lot of people have been in, somewhere where someone could say "yeah, I've been here". By doing this, the person that is going through this experience will be able to relate to their past experiences of being in a similar area, making them comfortable and familiar to their 3D generated surroundings.
I have found a couple of ways that I could do this, both operate by generating a 3D model of a map, which we can later use as the ground and buildings, which we can then texture and give Normal maps to. The first way is by using a Blender addon called "Blender GIS" to retrieve the 3D information. The video below explains how everything works.
The fact that (once you get past the elaborate setup) the tutorial makes it so easy just to take any slice of the Earth (according to Google) and observe it in 3D modelling software is really impressive to me. Saying that however, when I did some tests of my own, the results were pretty disappointing. I followed the tutorial, and I picked an area that is very familiar to me, the town where I went to secondary school. In the video, he uses London, which has a lot of information for buildings, rivers, roads, etc., but where I picked doesn't seem to have that as much. Instead of looking like a city or a town, it more looks like some random polygons over a map.


The Process


Final Renders
Since these results didn't exactly remind me of home, I tried the second method I found, which looks a lot more promising. This one was far more difficult to get the hang of, and at one point I found out that the reason why I couldn't get it to work was because a piece of software I was using was too updated, and I had to find an older version. The software I used is called RenderDoc, which works in tandem with a Blender addon called MapsModelImporter. Once I figured everything out, it was pretty easy to get into a flow, and I made a few slices of the map.


The Process
I noticed that the further back you are in Google Maps, the more amorphous the 3D model gets and the lower resolution the texture gets. This is most likely so that they can render as much as possible without putting too much strain on the browser. However, when you export the 3D data, you can go in and see all the corners that were cut to make it faster. I took another slice of the local leisure center's car park at the furthest I could zoom in to see the highest amount of detail that you could achieve, and it's just good enough so that you can make out the text, shadows, objects, and textures. It's quite interesting to see how it compresses the data, and it's also very strange to see a place that I've known for so long in such an alien light. I picked an area I knew for these tests because I wanted to know if I could use the 3D data and have it trigger certain memories, and it did. When I was roaming around in my virtual hometown, navigating became easier and I recognised all the buildings that were there, and what I was doing when I was there. I find this very interesting, as it is as if I am looking at postcards of where I live - giving me nostalgia for a place that does exist, using a thing that doesn't.


Final Renders
Practically, I think that using RenderDoc and MapsModelImporter moving forward would be in my best interest. Since I don't think you'll have much need to move around too much when you're in the experience, so zooming in as much as I can to attain as much detail as I can and restricting the movement area with fog or an invisible wall would be perfect for what I want to achieve. And since your movement will be bound to a certain area, all the surroundings will mostly be in the background, meaning they don't have to be too perfect or realistic to pass as an environment. Also, this way, I can import the 3D data into Blender and clean up the models or paint on it myself with my own textures using stencil texturing. Exciting stuff!
While working on this, I was reminded of a couple of things. Firstly, I was messing around in Google Maps right at the beginning of lockdown, and I was taking screenshots of my hometown in a similar manner to the above renders. I was basing it off of landscape photography and edited it to look like it was shot in black and white with a red filter on. Weirdly, these have a lot more detail in them, so I might look further into why that is when I pick the locations in the future.


It also reminded me of Jon Rafman's 9 Eyes work using Google Maps. We're both doing very similar things, using the utilitarian images of Google and reappropriating, reframing, and repurposing them (with slight inspiration from Sublime art). There are differences though, he takes screenshots and I take the 3D data (obviously), and where he looks for the weird and is inspired by the sublime, I'm looking for the mundane, and the unordinary. It's a lot easier to find what I'm looking for with Google Maps I've found.
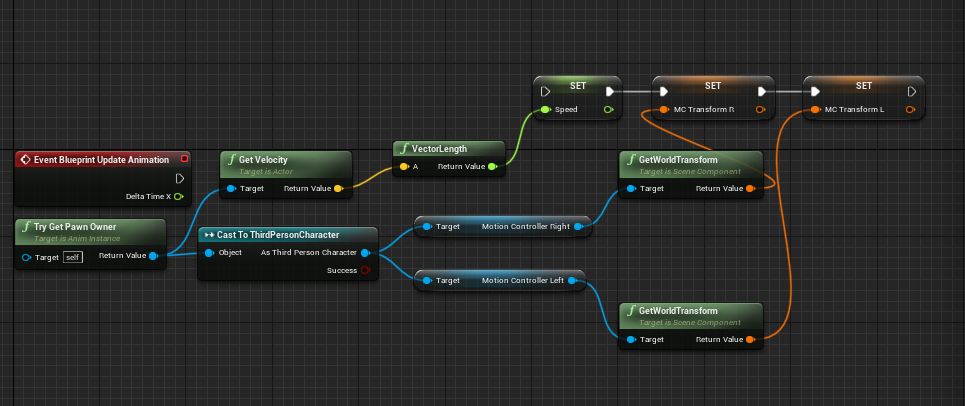
M A K I N G A P L A Y A B L E C H A R A C T E R T O T E S T A N I M A T I N G
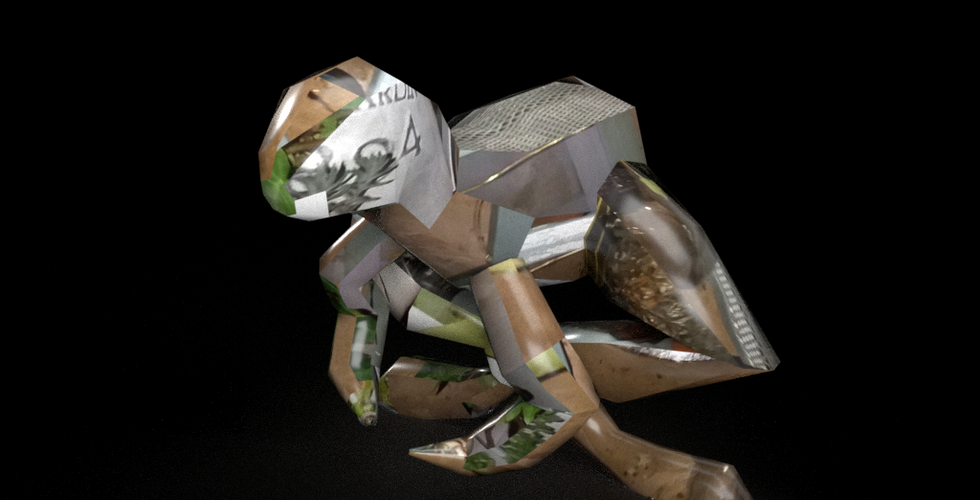
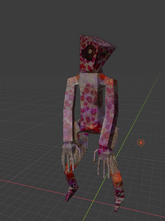
Since I was on a bit of a 3D modelling kick, I made a player character. I think that having a character that you play as is fairly important, as it allows you to again feel as if you are controlling a being, having your real-life decisions have consequences in the virtual world. I think that his works especially well for my case, as there is no story to go along with it, so the player character is a shell for you to fill in yourself. I textured them again with Textures_DTD images, but I will most likely go in again and re-texture with the photographs that I take. For now though, the generated ones work great as placeholders. I accentuated the controllable golem character by picking very rocky and jagged textures, and gave them a very nonplussed blank face. I went with the bipedal form because I think it would take a lot less getting used to seeing a body and two legs beneath you in the first person than with any other form. Also, I gave them weird little hands with two appendages to emulate a hand, which could be animated to grab other objects which I can map to the buttons on the VR controllers for visual feedback. The other reason why I made them a biped is that Adobe's Mixamo requires your models to be that way so they can animate them properly.


The Making Of
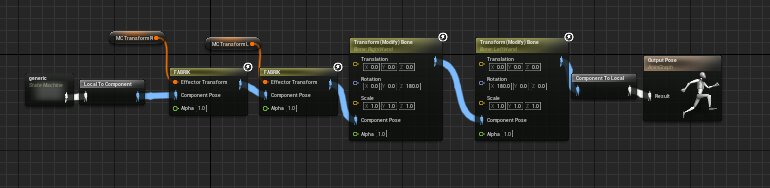
I imported the model into Mixamo, and the rest was so easy. It just asks you to place markers over specific parts of the body (so it knows how to compile the skeleton) and that's it. After that, there are tons of free animations for you to sift through and pick, and you can view your model performing in the window on the side. You then just download each animation as a .fbx file and then you're good to import and use them. I downloaded a basic locomotion set with walking, turning, jumping, etc. just to test out how to assign animation in Unreal Engine, and also because I just wanted to see the little guy bust a move. This was also the first time that I had tested anything in Unreal. I was scared at first, and I still kind of am, but after following a few tutorials I realised that everything can be quite intuitive and as long as I follow the videos exactly then I know nothing will go wrong. The only problem with only following YouTube tutorials is that not everyone does things the same way, so different elements could get in the way of each other and cause a bunch of errors. That's why I picked Unreal Engine 4 though, because of their easy to use Blueprint system. It's just a bunch of nodes that you drag and drop, you don't have to do a lick of coding at all if you don't want to. This system is so easy to use that following the tutorials is a breeze, and because there aren't really multiple ways to do things, I don't foresee anything causing the game to malfunction.


The Simple Animation Process
I followed this tutorial and came out with something that I'm very pleased with. Sure, it's just a simple walking animation and that's it really, but to me, it's one step closer to my goal. I wouldn't say that it got me "used to" the animation process, as the video was 14 minutes of pure mayhem and wasn't as easy out of the gate as I was expecting. I had to watch the video through a few times though, as I got things wrong a few times. That repetition however did teach me a few things, and I could say that I might be able to get at least halfway there before having to look at the video again. It's fine though, as long as the videos stay up, I can watch them as many times as I want. I wasn't too fussed about this being a little difficult, as it was just a proof of concept. Like I said earlier, I want to rig this dude up to a VR setup.
The Result
To do this, I'll be following this tutorial using the same 3D model. I'm doing this because I think that having a body underneath you is a comforting feeling, as no one likes to be a floating head. A game that I played that did this was Boneworks, and even though I could tell that it wasn't actually my body and the legs were moving on their own based on the character's movement, it did help to trick myself into thinking that it was there (a sort of 3D placeholder).When you would fall in the game, it made it feel a lot worse as you saw your body underneath you react. It's a lot like the psychological phenomenon where if you get something to stand in for your body and your brain is sufficiently tricked into thinking it is actually your body, then you can do things to the stand-in object and elicit a response from that person. I first saw this in a Rhett and Link video where they try it with a VR headset and a mannequin. It's the same thing, except the VR headset donning mannequin is a 3D object in the digital realm with a player camera fixed on its head and set to rotate along with your headset.
T U R N I N G M A P S I N T O L E V E L S
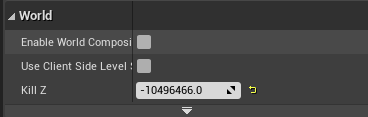
Next, I wanted to see what would happen when I tried to import the 3D Google Maps files into unreal and use them as terrain for the player to walk on. This proved difficult at first, but I found out (yes, all by myself) that Unreal has two ways of calculating collisions. There are options for a Simple collision map, and a Complex one. The Simple collision map makes an average of the overall shape, and with a mesh as complicated as these, it basically had a forcefield over the entire object that my playable character couldn't get to. To fix this, I changed the Collision Complexity to "use complex collision as simple", and my player character could run around as if it was there in real life. For some reason, the maps were exported really tiny, so I upscaled them in Blender before importing into Unreal. Also, I noticed that my character was disappearing when I ventured too far away, to fix that I decreased the "Kill Z" parameter which is put in place to kill the player if it falls out of the map somehow. I just whacked it all the way down for now.


Putting it all Together
Testing out Map #1, Low Detail
Testing out Map #4, High Detail
With these tests, I can tell that everything is coming together. Now that I have something that my placeholder character can run around in, all I need to do now is have a VR playable character and I can put it on the map and have it work perfectly. I want to play around with getting more detail in the map that I render from Google, because I enjoyed the environments where I could make out objects more than the environments that were made up of vague polygons and colours. I think that it would take the human recognition quite far I think if people could tell where they are. I attempted to make the environments a similar scale to their real life counterpart, using the player model as reference (assuming it's the same size as the average human). I did this by eye, but I think I got accurate results. It would be a lot easier to tell in first person with a VR headset on though I think.
Speaking of, I won't be able to do any of the testing when I make the VR rig, as I am home for Christmas, meaning the Oculus Quest is with it's owner. I plan on doing as many myself as I can, but any test builds that require a VR headset or the controllers, I will send to him to try out for me. I'll ask him to screen record it too, so we can see the results for ourselves. I'll ask him to add in a webcam in the corner too, so you can see him move and how the model moves in parallel. It's up to him whether he wants that or not though. I may potentially be able to, but it still remains to be seen. I've asked for a VR headset that I can clip my phone into, and there is software to trick your PC into thinking your phone is an actual headset, allowing you to play games, go on Steam VR, or Desktop VR. The only thing I'm worried about is that the mobile phone headset doesn't come with any controllers, so I don't think I'll be able to do anything with it except just look around. We'll see when the time comes.
B U Y I N G A N D T E S T I N G O U T P S X F X
Now is the time! I'm a little reluctant to purchase this but I think that I will be so pleased with the results that I'll forget about the price tag. Plus, I saw that the developer of PSXFX updated it 6 days ago (as of writing this), which means that it is constantly updated, so I can use it for future projects as well. Also, as of right now, the developer put the pack on sale for 25% off, making it $24.54 (£18.22). The stars must be aligning!
So, it's been several hours later, and I'm stumped. The only tutorial I found was from the dude that made it, and all he said was to drag the PSXFX folder from the download into your project file. I've figured out that if you import a few blueprints then the default settings appear and everything looks lower resolution and there is a slight dithering effect. However, when I try and move some of the parameters around, nothing happens. Also, the vertex snapping, fog, draw distance. and all the other things don't work either. I was trying this on the project with the player character I made, and when I saw it wasn't working there I tried opening a blank project and trying it there. Again, I wasn't successful. I opened the PSXFX project demo and everything was working perfectly but I couldn't figure out what the difference was. I was pulling my hair out, and the only thing that seemed like it was going to be of any use was the discord server that the developer set up. I'm not really the best at social interactions so I was a little reluctant to join, but with my head held high I clicked the link in the name of art.
After one polite welcome message from Marcis himself, I ventured to the help section, and found someone with a similar issue to mine. It seems that we can see the dithering and the lowered resolution because those are post-processed effects, whereas everything else is powered by other things, like the vertex snapping being a function for materials. I went back into my project to see if I could do anything with this new knowledge.
What's also cool is the showcase section on Marcis's discord, where people who have bought the asset pack can show other developers the stuff they're working on. I found plenty of screenshots that I can use for inspiration, mostly so I can compare effects levels to make sure I get them as accurate/subtle as the people who know what they're doing. Maybe once I'm done I can put my project on there and see what they think!


B U Y I N G A N D T E S T I N G V R I D G E
I have wanted to make this a VR experience since the beginning, so finally being able to test it out finally will help me be able to visualise where this project will be able to go afterwards. I followed a tutorial on this video that shows me how to turn a 3D model into a VR controllable character. I made this all without a way to test it, and I sent it to my friend with the actual VR headset but I never recieved anything back in that regard. I needed to take matters into my own hands.


The Texturing, Animating, Rigging, and Programming of the VR Model
UV Map
Since I wasn't able to do any of the VR testing on my own and I needed to do it sooner rather than later, I sought out options that helped me test it out with the things I have already. There is a software out there called VRidge by RiftCat, which takes your phone and makes the computer think that it is a high end VR headset like an Oculus Rift of an HTC Vive. Rather annoyingly, the free version of the software only allowed you to use it for ten minutes a day, which would be useless to me. I'm finding it appropriate that this body of work is somewhat inspired by Vaporwave art, because I too grow tiresome of capitalist bullshit making me pay to make art. Howerver upset I was about it though, I caved just like every other human being and paid for it anyway. I recieved a little VR headset that you can slide your phone into for Christmas (which I asked for specifically so I could test my project out), and this seemed to be the only option for me to test it all out without having to rely on other people to do the tests for me, so as reluctant as I was I went for it anyway.
Initially, I found the stream between PC monitor and my phone to be very low quality and laggy. You can adjust the bitrate slider to determine how much information is sent to your phone per second, but if it was anything above 1kbps it was pretty unusable. 1kbps provided a smooth video feed, but it was so low resolution that you could rarely make anything out.
Screen Recording of my Phone Showing 1KBPS Streaming Between Phone and PC
As Above but with 50KBPS
I had found an article on the RiftCat forum that was asking the same question as me - how do I get this to actually work nicely? Luckily, an employee of RiftCat came to save the day, suggesting that we use a wired connection using USB Tethering because that is a more direct feed of information, allowing a higher bitrate than what is available through a WiFi connection. I had found a cable, and wanted to test the quick VR demo I had made using the little character.
VR Test Demo with 1KBPS
VR Demo with Max Bitrate Per Second
The turning in place works great, the camera tracking the VR headset works great, but the programmed movement is a little erratic and the tracking for the hands don't work (since I don't have controllers, and the only way to have them emulated with the method I chose to test VR is to buy a £4 app on two separate phones so VRidge can sense them as controllers). But, they are in the default position which tells me that they are ready to work, they just aren't recieving any inputs. All this aside though, it works! and it doesn't look too bad doing so either! I really like the idea of having this project being as accessible to anyone, so even if you didn't have a high end VR headset device you could still have the experience. I'm yet to find it though, as VRidge makes you pay if you want to spend more than 10 minutes playing with it per day.
Also, you might have noticed that the character's arms were jutted in front of it. I think this is to do with the fact that the arms are looking for inputs from motion contr0llers, but because I don't have any, they are resetting to a default position. RiftCat sell an app that you can buy for a further £4 that can turn a separate phone into a motion controller, but then I would need two spare phones just in order to try it. Unfortunately, with my intractability idea for this game being thwarted, I'm going to have to scrap the idea for an in game camera for now. Unless I pay another £4 and ask my mum and brother to borrow their phones every time I want to try it out, of course.
L O O K I N G A T S O M E W O R K B Y D O M I N I C H A W G O O D
One practitioner I really think has been valuable in my research so far is Dominic Hawgood. I’ve particularly enjoyed his psychedelic-fueled digital work Casting Out The Self. This work takes all of the disciplines that he is under and mashes them all into one, making a site specific installation. He uses a lot of CG and 3D Modelling in parallel with his photography, bridging the gap between the digital and the ethereal. While I am all for the psychonaut movement, this work mostly speaks to me because of how the work was made, and the experience it creates as you view it. It takes the digital world which is often seen as cold and clinical but it makes it appear mystical. Hawgood draws a lot of inspiration from scientific research, especially in the techniques that they use to operate the machines. For him, it’s the transfer between real life and digital (through photogrammetry mostly). A quote from Hawgood reads: “You can learn about all kinds of imagining techniques and you find out you’re hacking your perceptual system, creating illusions and deconstructing the world around you”.


Works From "Casting out the Self"
I have tried photogrammetry previously using VisualSFM, but I attempted to push it to its limits without really knowing the full extent of the software in the first place. I feel like trying it again, since I like the implications of turning photographs into interactable versions of themselves, and I also think it would save a lot of time on making the objects themselves, instead of me having to make them all vertex by vertex in Blender.
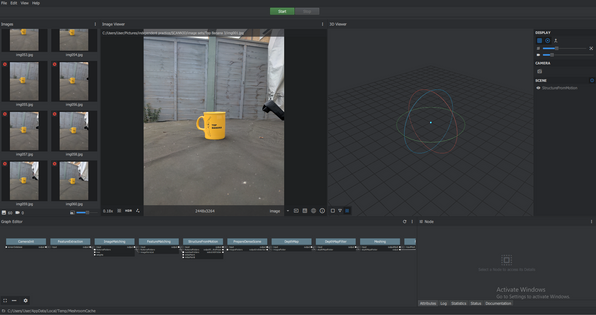
T R Y I N G O U T P H O T O G R A M M E T R Y U S I N G T E S T P H O T O S
To test photogrammetry properly this time, I employed the use of an app called SCANN3D, which I've used before. Since it's an app, the application has to be a relatively small file size (just like the games from the 80s & 90s), which could potentially mean that they had to take some shortcuts in how the 3D objects are rendered and formed, so it could be cool to see the differenced between the app and some PC software that does the same thing. As for which objects I'd like to use, I think I'm going to keep it to every-day objects that one could find in their house. Again, I'm going for an effect where people feel normal in their surroundings, so I feel as if that would be the best choice. Plus, things around my house are the only things that I can get my hands on at the moment due to covid. I took a lot of inspiration of things to make into 3D objects from Hawgood, since he used regular items in his work, like empty glass bottles, books, a keyboard and mouse, and a smoking pipe.
I went around room to room picking up objects that I felt would be simple to scan in and easy for the app to understand and render properly. So nothing with too many corners and edges, and nothing too transparent. I put up a white sheet outside behind the objects to shoot them so that there was no background information getting in the way, and I got shooting. Luckily, the day I chose to shoot these kind of overcast, so the outdoor lighting was nice and flat and even. The app asks you to set your object up and rotate yourself around it so you can take pictures of it from all sides, but instead I just rotated the object itself on the sheet to achieve the same thing. The only thing that I wasn't looking forward to in this shoot was the fact that it was horribly cold outside.
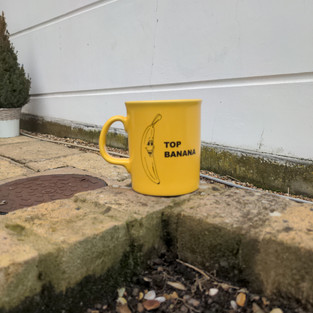
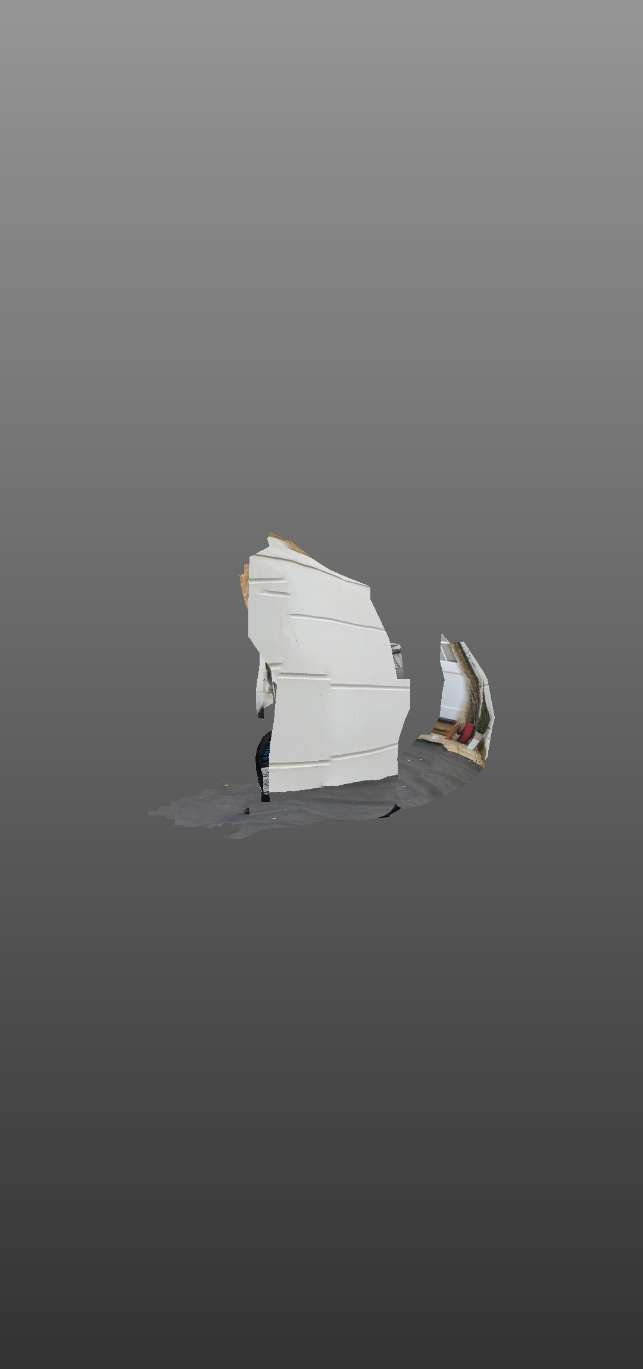
The shoot was... weird. My first object was my Top Banana mug. I attempted to construct a makeshift infinity table using a garden chair and a bedsheet, but the app told me that it didn't work. I tried again by actually circling the mug, but that image set didn't work either. I tried one more time by placing the mug in the centre of a circular table and walking around that, and it worked... sort of.


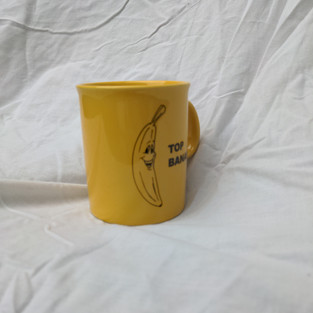


Top Banana Mug Image Set 1 (Didn't Work)


Top Banana Mug Image Set 2 (Also Didn't Work)


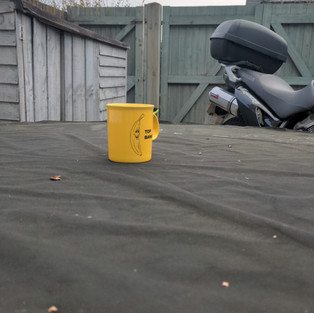
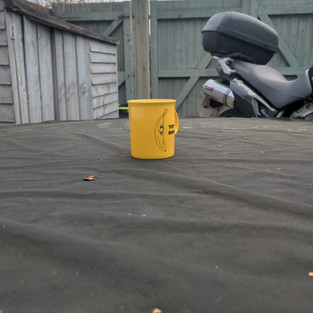


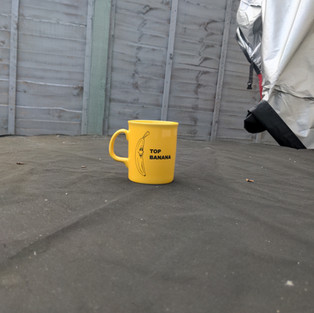


Top Banana Mug Image Set 3

Thumbnail Generated by SCANN3D


Final Renders of .obj in Adobe Dimension
As you can see, it didn't just scan in the mug, but the table, and everything else in the background as well. It looks super cool, except it is going to be a little difficult to incorporate these as objects to look at in the experience I'm making. I think that this is because all the objects I picked to scan were a little small, so when the app was looking for information to make up the object, it took to the background instead. I could still use them in the game perhaps, as even though it's an "unrealistic" rendering of real life, it is still represented and you can still make out the objects in question. The objects also look a lot like some alien terrain, so playing with scale here could be interesting. I feel like that takes what I've been looking at and reverses it, where it takes something that you're used to and instead of having it look different but feel the same it makes it feel unusual, which could induce some unsettling feelings. I think that having the two contrast each other in the same piece. Some may say that it clouds the meaning and it could be confusing but I feel that the only way to know that you feel something is to feel something that contrasts that feeling in the same space/time. Once you feel one way, you can identify that feeling stronger once you've felt the opposite. So if you start in an area that you are used to but move to one you aren't, you will notice that you felt normal in the first place because you feel that normalcy leaving.
Also, just a side note, in order to export these .obj files, I had to "buy" a month's subscription to SCANN3D. I say buy in quotation marks because they had a 3 day free trial. If I wanted to carry on with it though, it would've been £5.49 a month.. I must say, I think that charging in order to export is a little over the top and I was a little annoyed that I had to even put my card details in. In hindsight, I could have looked for some free alternate photogrammetry apps, but this one seemed to be the most prestigious.


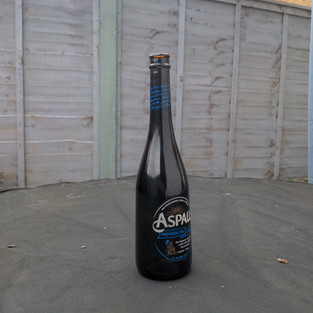


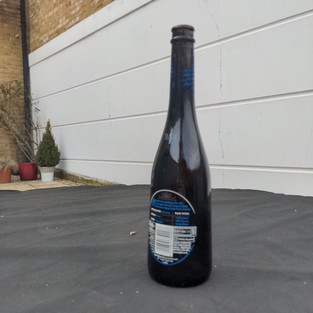


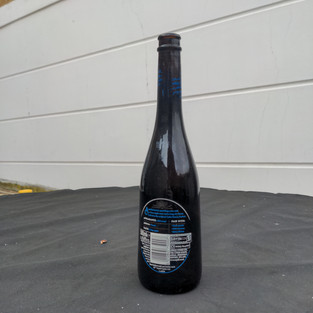


Aspall Bottle Image Set
Thumbnail


Renders


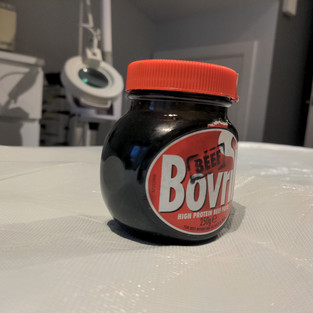


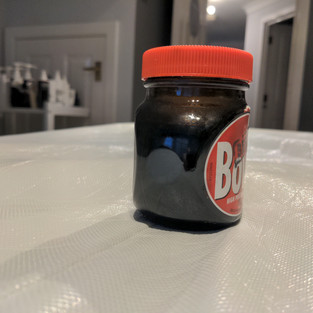


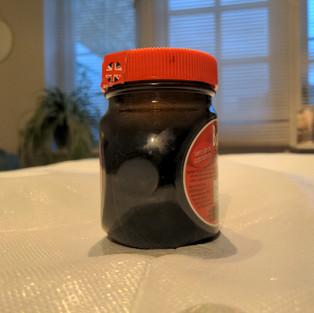


Bovril Image Set
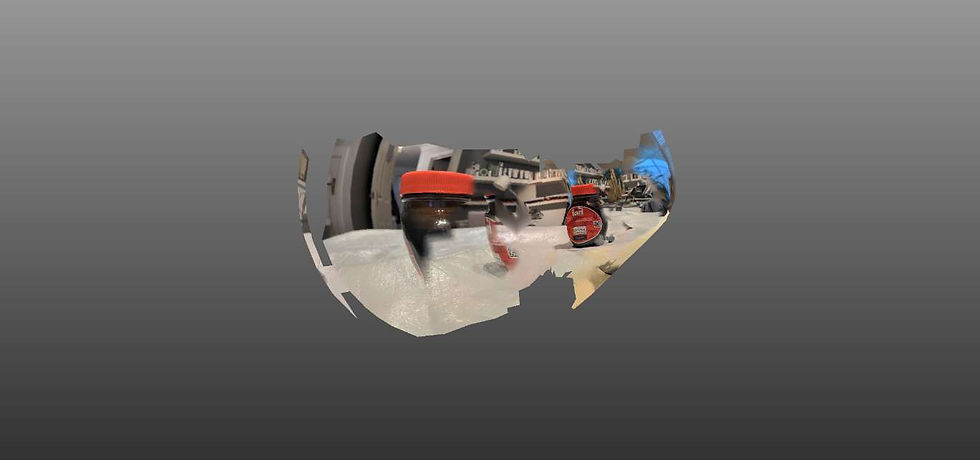
Thumbnail


Renders


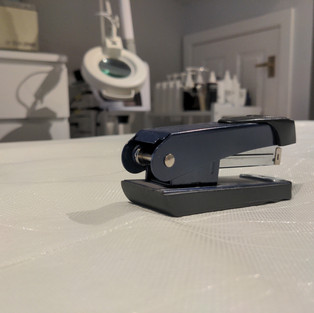


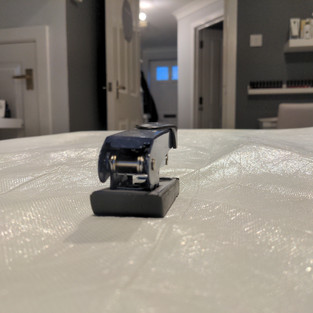


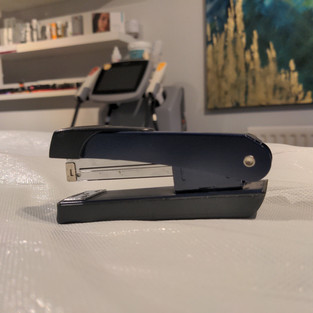

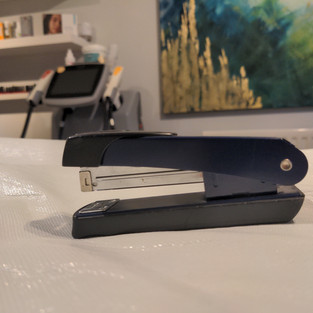


Stapler Image Set
Thumbnail


Renders
So I'm in a bit of a state of confusion here, as I didn't get what I was looking for with these experiments, but what I have has a lot of potential. That being said, I still don't have actual things that resemble objects, just things that elude to objects with signifiers of the backgrounds that I did the shoots in. I've tried another piece of software earlier in this project called VisualSFM, and I feel that I would get some "better" results on a PC application rather than a phone one.
I decided to test VisualSFM out one more time, using the image sets that I got in SCANN3D. I could also use brand new image sets, but SCANN3D has an interface when taking the images that helps you take images that can be stitched together properly easier for the user.
I think I misunderstood what VisualSFM does. In fact, I have no idea what it is used for. I thought it generated a 3D mesh, but instead it seems to create a bunch of vertices floating in 3D space. It also exports as the file type .nvm, which (to my knowledge), you can't import into Blender. I went back to the VisualSFM website for answers but all the info there is just what it does and how to used it, not any things to use if for. I think I was barking up the wrong tree with this software the whole time.


While reading a bit about different photogrammetry softwares, I came across several that had outputs similar to VisualSFM, where rather than a polygon based mesh, it's a bit like a three dimensional pointillist painting. It turns out that that's called a "dense point mesh", which are used to measure external points on external surfaces or objects. With some better software (or perhaps a higher quantity of reference images), I could have point clouds that look like this:

Geo-referenced point cloud of Red Rocks, Colorado (by DroneMapper)
Example from sofware called MicMac

An example of a 1.2 billion data point cloud render of Beit Ghazaleh, a heritage site in danger in Aleppo (Syria)
(It looks super compressed here because of the Wix filesize limit, but I would look this project up, it's pretty cool!)
Reading even further on it, I found out that that's how most (if not all) photogrammetry software works. It finds similar points between the image sets, then calculates the distance between them. Then, it takes each point and generates edges and faces between them, resulting in a final mesh. What we were seeing in VisualSFM was just the moment before we turned it into a 3D mesh. That wasn't something that you could do with that software though, so maybe I should try some new ones. Another thing that I learned was that photogrammetry software is supposed to render the background of the images as well, so if you wanted to isolate the object in question, you can do so yourself by using Blender or other 3D modelling software.
With this new knowledge, I uninstalled VisualSFM and tried a few other (free) options. I was again frustrated to see that the software with the most immaculate results are paid services. Again, my art is put on hold due to capitalism.
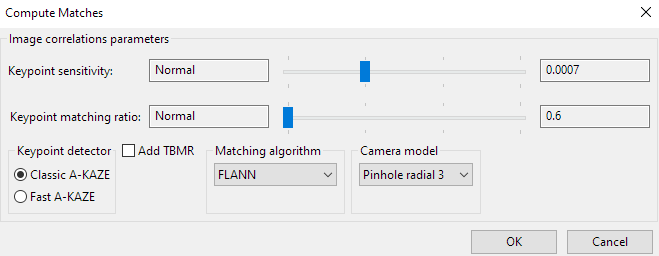
REGARD3D
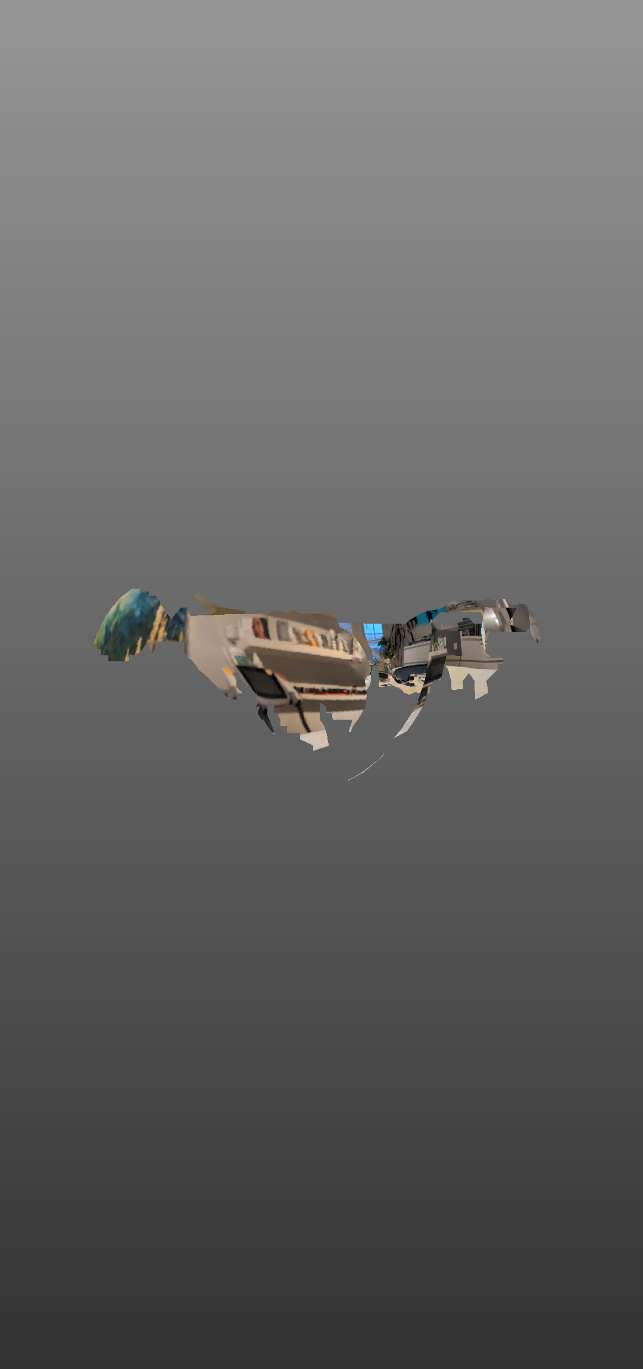
This software was pretty intuitive, all you need to do is upload the image sets, then just proceed through the next steps. All parameters have a default that you don't have to mess around with if you don't want to. I found that just leaving them alone gave me pretty reliable results, most changes made me wait over an hour for anything at all. I processed the top banana mug and the stapler image sets, and they both came out with really strange results.


The Process
The results are far more bizarre. the surface looks like an undulating lava lamp with dull earthy tones projected onto it. I tried it again with the stapler image set and I received an equally strange object. I exported them as .obj files and imported them into Dimension to do some artsy renders, and I found out that it doesn't export them with the images, and it doesn't look like there's an option to do so either. I just made them appear metallic and made some renders that are reminiscent of Edgerton's Milk Drop.


Renders of the Top Banana Mug


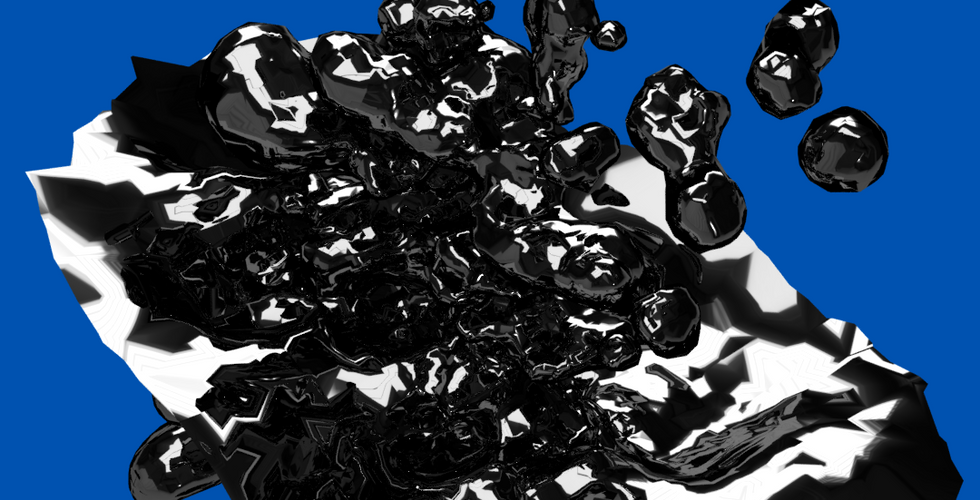
Renders of the Stapler
Like I said earlier, it would be interesting to include these, but they seem a lot more like interpretive sculptures rather than the things that they are meant to be. At least with the objects created with SCANN3D has all the signifiers of what the object is in the images that I provided, so where there are photographs of things we can tell what it was supposed to be. This seems a lot more cryptic. Again though, I could make some ambient background pieces with this just to help set the tone. I could bring one of these into Blender and texture it to look like foliage or rocks or something like that and use it as scenery.
There are examples of Regard3D actually working really well, so I've begun to realise that maybe the issue is lying with the image sets I'm providing. I'll try another shoot in the future, in the meantime I'm going to try a different software.
MESHROOM
Meshroom is amazing! It's incredibly easy to use, all you have to do is upload you image set, and hit go. It takes a little while to get your final 3D object, but it is so worth it in the end. I really like the look of the UI as well, it looks like it could be an Adobe software.


The Process


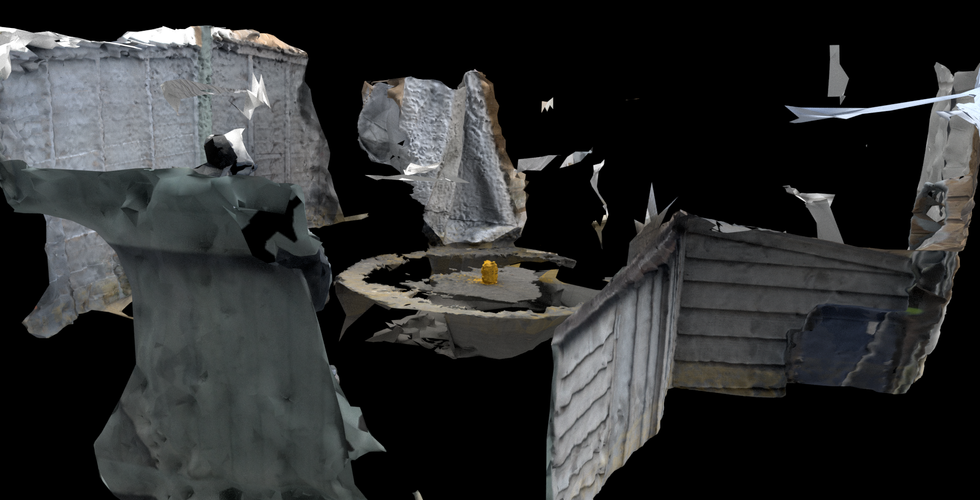


Renders
I was blown away with how accurate it was. I could make out the entire layout of my garden just by looking at the point cloud. It even got the distances between everything right, it's like looking down at it from my bedroom window. The entire mesh of the object is a little messy, but if you look at render number 3 and 4, it's actually generated a 3D model in the centre of the table. All I would have to do is make a plane cut beneath the mug and delete everything that isn't the thing I want to keep. Don't get me wrong, it doesn't really look like a mug whatsoever, but these are just tests. I can do another shoot where I give this software a higher count image set where I get in and give it more detail. Impressed, I continued using all the other image sets I made with SCANN3D and put them through.


Renders of the Aspall Bottle Model


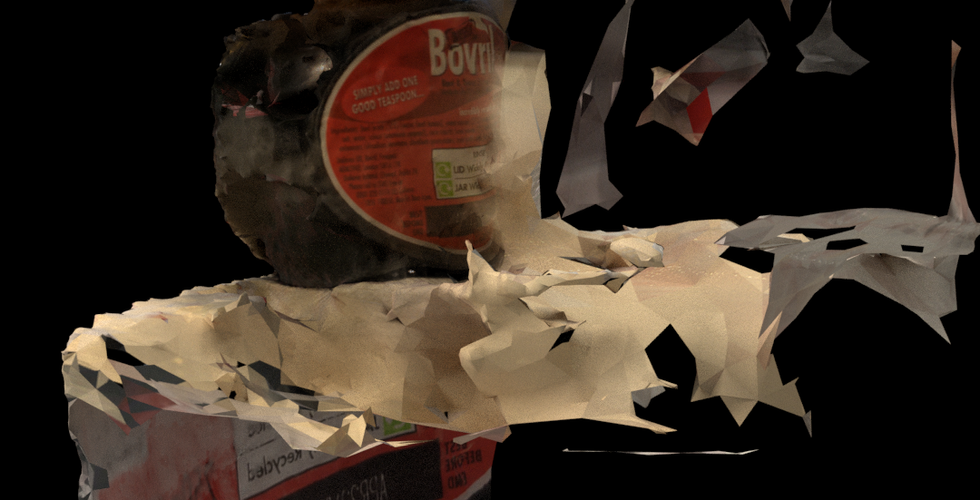


Renders of the Bovril Model


Renders of the Stapler Model
I would really like to use this software again, as it has given us the best results so far, and for completely free, too. I think that we will be able to create some much better results if we gave it an image set with more images in. With that, I can do like I described earlier and actually make some pretty decent objects.
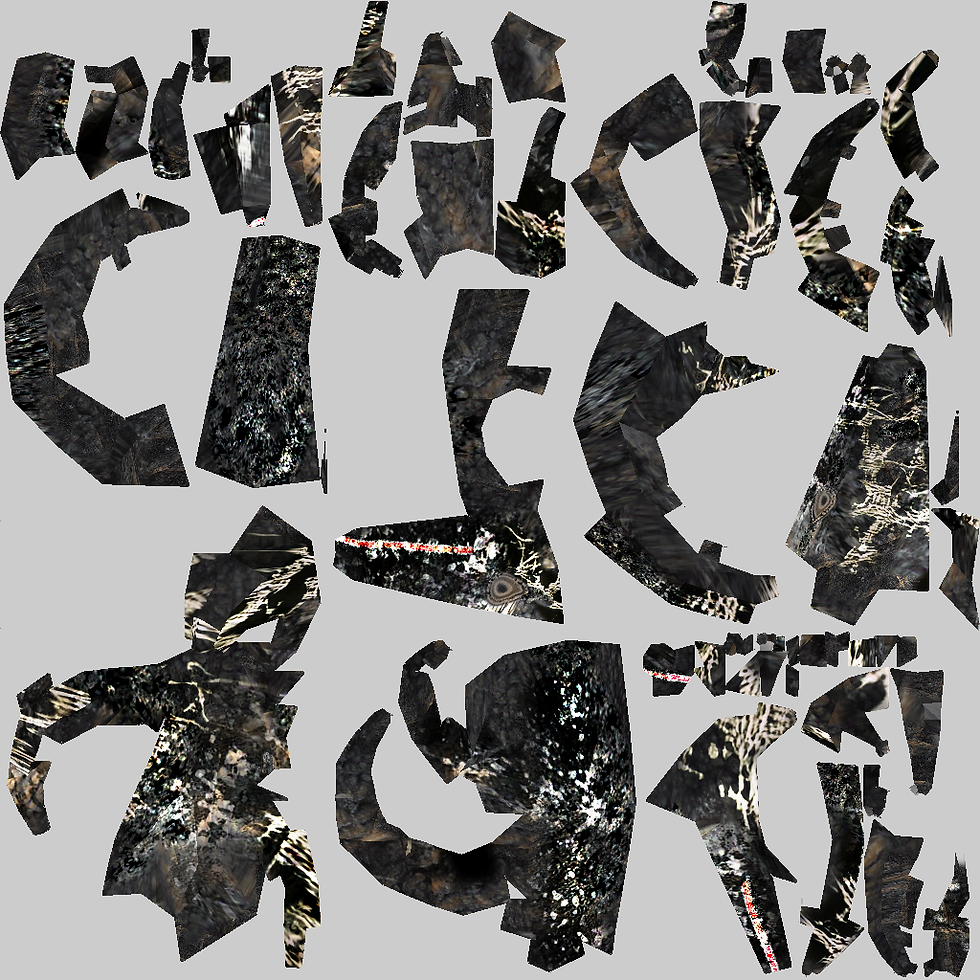
To test out the full functionality of Meshroom, I decided to do an image set of my desk. It's messy, but don't judge. I did my best to capture as much detail and as many angles as I could all while trying to maintain similar reference points in each image. The lighting was not ideal, just a horribly bright lightbulb giving off a warm light, but to remedy that I used the flash on my phone. 225 images later, I imported them into Meshroom and clicked start.


Renders


Generated UV Maps
I think that this model looks amazing! I really like that you can make everything out perfectly. This is clearly the best tool that we've come across for photogrammetry we've come across so far, and it's allowed me to achieve my goal of getting objects into the digital realm. This model is far from perfect though, but again that's due to the photoset not being up to scruff. I enjoy the terrestrial look of the low polygon count though, which looks a lot like the 3D data that I sourced from Google Maps. Luckily, Meshroom allows you to add photos to the photoset on the fly, so if you see somewhere that needs more detail, you can go back to the scene later and reshoot. I think that because I didn't do any shots capturing the entire scene, the program had to make up a lot of where things are in relation to one another. I have two monitors on different desks, and Meshroom merged them together. I think that this would look great in VR too, so I'd like to import it into Unreal and set up a scene. The only thing to do now is test it.
M I T C H K A R U N E R A T N E & E D G A R M A R T I N ' S M U N D A N E S P A C E S
Mitch Karuneratne is a landscape documentary photographer who focuses on how stories are held within the land and the relationship between the land and regional identities. She has a few projects listed on her website that I think relates to the idea that I have surrounding mundane places and every day surroundings. The two projects I chose both have meanings, (about water drainage in Following Cornelius and the Ley Lines in By Knowledge, Design and Understanding) but the locations are mostly what I'm interested in with her work, especially since they feel very homely. I can name somewhere at least 5 minutes away from my house in all directions that I am reminded of with every single shot in Following Cornelius, and the same goes for By Knowledge, Design, and Understanding. In fact, I am reminded of some of the 3D models I made out of Google Maps data, since both are relating to a countryside residential area and a town centre. The overcast skies in every shot really drives home that feeling of "ah yes, I'm home" for me, since it's pretty much just what I'm used to seeing in the sky every day where I live.


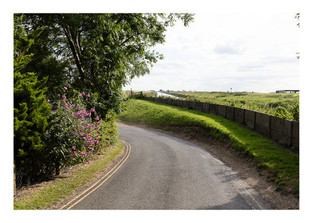


Assorted Photos from Following Cornelius
While looking at her work, I had a thought. What is considered "mundane" is completely subjective, so what might feel usual to someone could feel odd for somebody else. For me, those renders I did of my hometown earlier is peak mundaneness for me, but when I upload the work, it's available to anybody form all over the world, so only 113,137 people (population of hometown) out of a possible 4.66 Billion (how many people on Earth that have internet) people would be able to relate to me. I also can't really go out and find somewhere that I think would be relatable to everyone, because ultimately I can't really account for those 4 billion people. I also can't go out and ask people what they think is relatable to them, because my sample size will never be able to cover the opinions of everyone that could possibly come across my work.
After I thought that, I looked at Edgar Martins's work. I looked through each one of his projects on his site, and I found a couple of them that I think relates. I wanted to speak about the project The Diminishing Present which is shot in his "adopted home-town of Bedford", and is about what home is, but I think that, like Karuneratne's work, the regularity of the subjects in those photos is all relative, although it is distorted through thick fog in the daytime images, and through darkness and spot-lights in the nighttime images, making it look like Bedford is an early 2000's British horror film. I enjoy how Edgar took something that he was used to seeing every day and presented it in a different, eerie way through stylistic choices. I think this is also reflected in my work, as I am trying to nurture the Nostalgia in Aesthetics idea through the visual style choices I've made. I also realise that what visual styles people are nostalgic for is also subjective, but like I said right at the beginning there is a wave of these types of games gaining popularity on indie-game publishing sites, so I feel that when someone who uses the site and knows what goes down there happens across it and gives it a try then they would get the vibe I'm going for. Anyway, the project that really grabbed my attention was A Metaphysical Survey of British Dwellings. It's shot in a mock-up town in the UK for the Met Police to train in a residential area type setting. Edgar sees deeper into this, saying that it's a metaphor of the "asocial city". Completely empty and shot in the dark, the lack of people combined with the isolated buildings surrounded in a voidlike darkness forces us to fill it in with our own blanks, so we can place it in any setting that best suits the audience. "An ambiguous game of identity and relation is played out, a game which encompasses an enigmatic assemblage of everyday life, transmission and flow, dislocation, bewilderment and solitude". Looking at the work, I certainly felt cold and alone in something I'm supposed to feel content and normal in. There are parts that I am used to for sure, for instance all the signifiers of a city (brand logos, streetlamps, road markings, windows, etc), but the grey bricks that make up the buildings help show their lifeless nature.

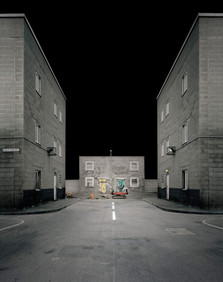


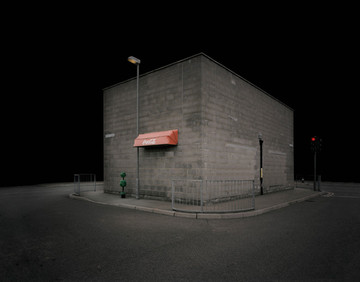


Coming away from this photo project, I am encouraged. I both found an answer as to where to look for locations, and I am also enthused that someone else's project can also portray meaning and push ideas through specific visual styles. In this project, the completely black background and well lit foreground reminds me a lot of the renders I do of 3D models. It almost makes me feel that all that exists is a plane with a single building on it, and nothing else exists outside of that. With 3D modelling that is 100% the case, so it's really cool to see photography that elicits the same feeling. Maybe that can be reflected in my final piece, as I would like signifiers of the techniques I'm using to be present in the work, because a lot of internet art exists purely to be a love letter to the software the artist used to create it. I really think that there will be a similar creepy feeling in my final piece because of the stark contrast between being in an environment that feels like home but also having a dissonant feeling that nothing is what it seems, everything is an illusion of reality, and that nothing else exists outside of your immediate area. If someone were to ask me about what this work is about, I would say that exactly. The Nostalgia for Aesthetics and my interest in Internet art is purely relating to the medium I've used to create the work, the inspiration for what kind of photographs I want to take, and how I wish to present the work when it comes time to release it.
After seeing this work, I searched for similar areas - places that were built up solely to look like a place, not function as one. I came across an article on a website called Google Sightseeing, which is a site that curates interesting things found on Google Maps. I went down a bit of a rabbit hole with this website, because I was finding it utterly delightful to be whisked away to Washington to go see the world's largest egg or to India where a mysterious collection of geographical circles was found. It reminded me once again of some of my favourite work, Jon Rafman's 9Eyes. They're essentially doing the same thing, using the constantly updated image banks of Google Maps and finding funny, interesting, cool, weird, and unexplainable things, and showing them to the world. Rafman's project errs more on the side of the absurd and tries to entertain you with funny occurrences, but Google Sightseeing is more of a curated experience that feels almost like an actual tourist website. Anyway, the article I found on this site listed five different sites that fit the description I'm looking for.
They all seem to be FIBUA sites, (or Fighting In Built Up Areas) which are used to train army-men and police to help them in a specific situation. The first example they give was built in the cold war, although they don't give the historical information for any others. It will be interesting to see the difference between each site, where different parts of the world consider different things to feel "normal". A lot of them are built to resemble the towns and cities of the countries that they are fighting for (the FIBUA called Eastmere has been changed to appear German, Northern Irish, and Bosnian over the years depending on the military operations of the time), which does a completely different thing, it takes a place that you are not used to and makes you comfortable around it. Because they're all military sites, access to any vehicle with cameras on would be restricted to come in, so StreetView images will be quite lacking. Also, I'm a little concerned that because they are so hush hush that Google might not retain any 3D information about them, but I guess we'll have to see.
The first step here is to actually "visit" these places. A few of them are a a couple of hours or so from where I live, but there isn't any need to be there myself, satellites have provided me with the images I need. I opened up all the links to the Google Maps pages of these ghost towns, and inspected them. I was planning on choosing one to use as the final map, but they are all so similar, at least they are when you only have aerial views of all of them. I also think that even having to choose one specific FIBUA is kind of pointless when I can have all of them mashed together into one giant Frankenstein's monster of a training ground.

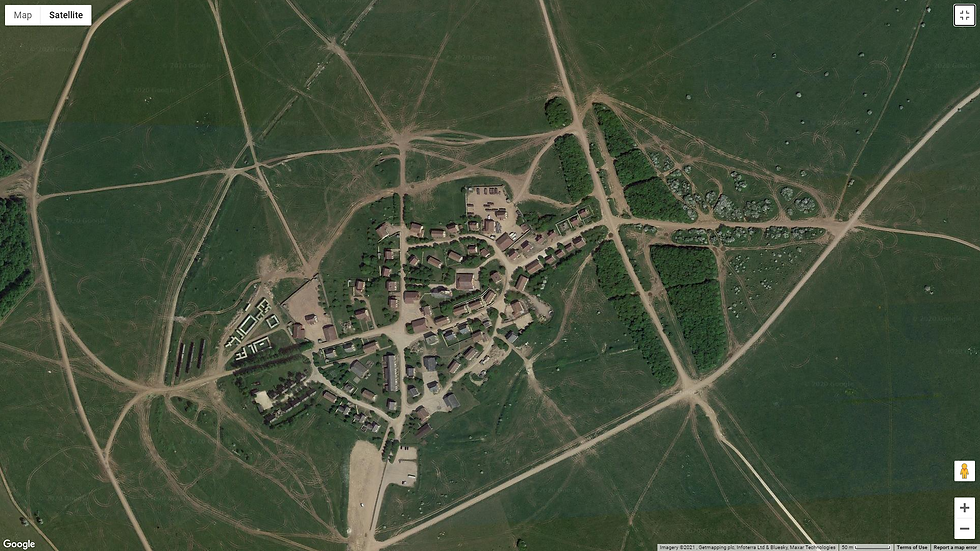


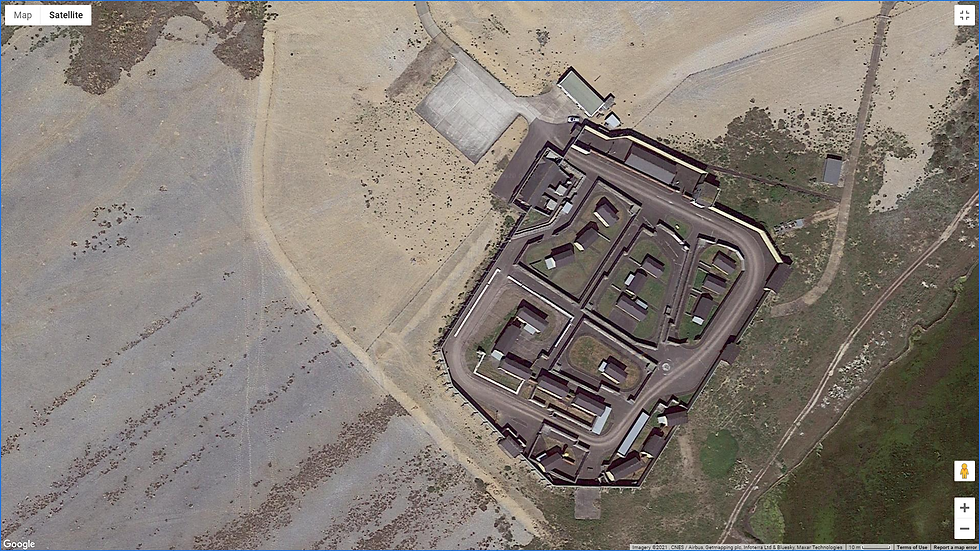
After collecting them all on Google Maps, I downloaded them, using RenderDoc again. I am interested to see what they all look like, because some of the villages are a lot bigger than others. This means that I am able to scroll all the way in for some (meaning I can get the most amount of detail), and further out for others. There will be a contrast in how things look. Perhaps I don't need to encircle the entire village, just take a little slice out of it. That way we can maintain maximum detail and we also don't end up with a final amalgam map the same size as Los Santos. We can then use the roads to link them all up, like it's a game of FIBUA Carcassonne.
And, just as I had feared, the only 3D information that was collected about these sites were the topological information from the ground beneath them. I'm not sure if that's because they're quite out the way in terms of public access or if it's because Google doesn't want to step on the miltary's toes but it's just not there. I went back in a second time with the "3D" option ticked, but that didn't really do anything. I am a little upset, but it isn't the end of the world. I really did want buildings and cars and trees and sand, but all I got were those rugs you used to get as a kid with the roads on it. You know the one.


Under the Urban Warfare Training header on the Urban Warfare Wikipedia page has some FIBUAs (sometimes called OBUA (Operations in Built Up Areas), or FISH & CHIPS (Fighting in Someone's House and Causing Havoc in People's Streets (Which in itself sounds like a psychopathically delightful way of putting the destruction of people's living spaces))) from other places, like the French Army with their CENZUB facility, or the Stanford Battle Area. Another site that they talk about is the small English village of Imber. In World War II, the entire population of Imber was forced to leave so they could use the village as a training ground in preparation for the Allied invasion of Normandy. The British Military has to this day kept a hold of it despite people wanting their homes back, and was used for training for operations in Northern Ireland. Copeland Hill, the 2nd FIBUA we I saw listed on Google Sightseeing, was build just 3 miles away from Imber as a newer, more purpose-built training ground. It wasn't exactly built exactly to look like a village in England, in fact it is one, But I think the history pertaining to it being a training ground and having a second village (this time built to look a certain way) built nearby when they couldn't use it anymore is just as interesting. Plus, it relates to it.
Doing further research, Stanford Training Ground uses Eastmere Village (The third FIBUA we saw on Google Sightseeing), and neither Imber nor CENZUB looks like it has any 3D info to them. To be sure, I imported them both to Blender and I was right. Just thin sheets with the Google Maps image pasted on it. I am reminded of Trevor Paglen's work with the blurry images of military bases, but that isn't a theme that I'm going with at all really, I was deflated, I thought I was on a good thread here. As a last ditch attempt to keep this idea alive, I sent an email to Edgar Martins (through the email found on his website) and asked him where the location of his shoot was (or where I can find it on Google Maps), and all I need to do now for this is hope Edgar gets back to me, and keep our fingers crossed that Google Maps stores 3D data of that site. To prepare for the eventuality that this flops too, I should start looking for other potential locations for my piece.


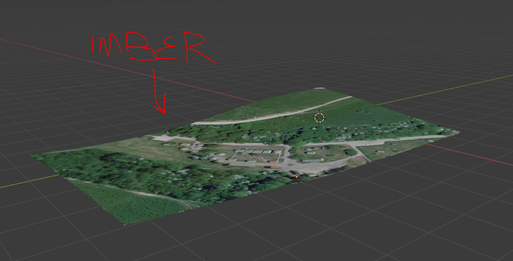
The Flattened Planes of CENZUB and Imber

Email Sent to Edgar Martins
OTHER IDEAS FOR PLACES
Fake towns built in America in the 1950s for nuclear bomb testing sites - google maps will have updated since then so there won't be any 3D data of buildings, but the site could be interesting to use. Plus I could make the 3D model that you walk around a vitalised, perfectly kept mannequin that they used for the testing, it could add to the whole story of the game, like how I had this whole story of AI colonialising and categorising humans through their perspective for my Vision and Knowledge project. It's just a little veneer to polish things up a little, but the underlying themes are reflected in the techniques and methods used to complete the work. In fact, taking the photogrammetry I did and using that in this setting would be good too, since I can turn them from items in my house to props used in the nuclear bomb testing site through framing. It is a diverging a little bit from where I originally wanted to go, but if one door closes, you have to see how many other ones are open.


Screenshots of the Bomb Sites in Nevada, Seen in Google Maps
Suzdal, Russia - where upon hearing that Putin was going to arrive, they went to all the dilapidated buildings and put decorated tarps over them, to create impromptu facades of buildings in order to hide them. However, when I went into Street View to find some (Jon Rafman style), I couldn't find any. Either they took them all down again before Google sent their cars there, or I just haven't looked hard enough. I did find an upside-down Shrek in a Dracula pose though, so if all of this is pointless I can at least say I have that.


Screenshots of Suzdal on Google Streetview
If we're diverging from my first idea, then we can talk about the town Milton Keynes - most cities are built because they're close to something, ports, other cities, etc, but Milton Keynes was just built because there were too many people and not enough places to put them. arguably the most baseline town because it was quickly built due to a population dilemma. people could quickly get used to the surroundings because modernist architecture lends itself not only to Milton Keynes, but most cities and towns around the world as well. Then again, me thinking that MK is a mundane city is only my opinion (even if it may not be an often contested one).


Screenshots of Milton Keynes in Google Streetview
Themed Tourist Sites in China - places in China made to resemble British towns and cities
If I wanted to keep the nuclear theme, I could use the Sedan crater in Nevada, on the same testing facility as all those villages. It's not the same exact location at all, but the idea is still there. Plus, Google Maps has all 3D geographical data, so the crater will work as a setting.
L I D A R S C A N N I N G
Something that I just found out about today that blew my mind was something called LIDAR scanning. I watched a video about what it is and how to use it, and it is everything that photogrammetry software is but 1000% better and more efficient. I would recommend giving that video a watch. LIDAR scanning can save me from having to take a ton of single photos and make sure the reference points are all there, you can just walk around pointing your phone at things and it can pick up the distances between the camera and the surfaces of the objects and generate 3D data out of it. Like all other photogrammetry apps, it uses the camera on your phone in combination with the 3D data to make a UV map of the scene. The app that he uses is called Polycam, and it works with the LIDAR technology built into iPhone 12 Pros. Yeah, it's only available on iPhone 12 Pros right now, but I'm sure that the technology will be more accessible in the coming months. It's such a shame though, knowing that the technology is out there right now for me to use for this project but I can't go and get it without paying for an iPhone 12 Pro.
It's still incredible though, and I'm looking forward to trying it one day. In the meantime, I've still got me, myself, and Meshroom.
P R O O F O F C O N C E P T
So, I don't know if you can tell, but right now I'm feeling a little lost. I feel like I'm going to many doors and finding out that they're closed. I sent an email to one of my lecturers for help, so I'm awaiting their helpful response. The only other idea I have ditches the illusion of a city place, and I was thinking of using Milton Keynes. I've never been there before in my life, but to me it seems like a really base-level city (no shade to MK, of course). Usually, cities are built somewhere due to their proximity to resources (water, metals, etc), but Milton Keynes was solely built to solve an overpopulation problem. It was built very quickly, so a lot of the built up areas are all just brutalist and modernist architecture, which every modern city also has in droves, which hopefully aids in making people used to their surroundings. I think the fact that I have never been there myself helps with me getting the meaning across, where if I can feel at home in a place that I've never been before, then maybe other people will too. I also have the Sedan Crater idea, but that is fairly too farfetched I think.
While I was waiting for my lecturer to return a response to me (I'm writing this the same day I sent the email, don't worry, I haven't been waiting too long), I wanted to make some kind of proof of concept, just to feel like I've got something to show. Not a final thing by any means, but progress is progress, and I feel like I'm not making much right now. The plan is to make a huge photoset of my garden, make it a level in unreal, make another VR playable character (the other one wasn't working too well), and test out what everything looks like in VR using VRidge. I also want to take this opportunity to see what PSXFX looks like in VR as well. It seems like a lot to do all in one go, but I really want to work on something. I will use this mock-up as the foundation for the final thing, as all I'll have to do is swap out locations and objects.
It was completely dark outside when I did the photoset, but I used the flash. I really wanted to make this as detailed as possible, just for curiosities sake. I didn't have a specific amount of photos that I wanted to take in mind, but when I got back inside and transferred the photographs to my PC I found out that I had taken 315. That is around 100 more than what I took for the far smaller space of my desk, so if need be I can go back and take more where necessary. One thing to note is that the images are quite noisy because it was dark out, so that might cause some issues/interesting visuals but we'll see what happens when we get the final thing.
The model took 10+hours to calculate fully ( hours to be precise). It stopped halfway through for a few possible reasons, being me running out of storage space (the test objects I made in Meshroom were 34GB all together!) - and because the Minimum of Consistent Cameras Bad Similarity was too high (I think, the progress kept on pausing around the DepthMapFilter stage, so I turned that value down. It's gone past that stage now with no real issue so I assume that that was the issue). It also got stuck on the Meshing phase, but I stopped the process, decreased the Max Points from 5 million to just 500,00, just to see if it will speed up the process a bit. I'm not sure if you'll be able to tell the difference between a mesh with 5M vertices and one with 500K, but I suppose we'll see. I had been checking a bunch of Meshroom forums for answers, and all of them said to reduce max points. There was another one that told me that I should turn Live Reconstruction off but it hasn't done anything that I can see. I can see just from the dense point cloud preview that there are a few spots that need a bit more love, but in the time it took for this test to finish the sun came up so I can go back into the garden and take more photos. The fact that it took so long just to get stuck on the meshing phase really bugged me. I just wanted to make something I could test out but apparently I can't even do that. Maybe I didn't turn the max points down enough, but I was a little fed up at this point.
That's when I remembered that I have a subscription to Autodesk products thanks to my uni. In their line of software, they have an item named Autodesk ReCap, which is another photogrammetry software. I was so insistent on using a free software for this that I had completely forgotten that I already have paid for one. Logically I don't think switching software would help with the fact that Meshroom kept on freezing (and I'm probably going to have to wait 10+ hours again), but if you pay for a good quality magazine, why would you read the free newspaper? What's really cool is that ReCap works with laser scans as well, so if I ever get my hands on whatever uses that I'll be sure to try it out (provided it happens before June 2021). It also has an auto cleanup feature, so if there's anywhere that looks a little janky then their algorithm will do it's best to knock it into shape.
When I loaded the 315 photos into ReCap, it came out with a little warning saying that projects can only be 100 images. This is fairly interesting, as all other softwares didn't seem to have an issue with this. Turns out it's because I have an education subscription rather than a professional one. I think that that's pretty gross, advertising to students that they can use this amazing software but you can only use a measly amount of photos that probably won't give you a decent result just because you didn't pay for it. This review on an Autodesk forum put my feelings in to words (almost) perfectly:

I even wrote my own thinkpiece on the ReCap IdeaStation, where users can suggest changes that they would like to be made. I am not the type of person to write these kinds of things normally, but I am really tired of being shut behind a paywall just because I want to create art. Not going to lie though, I did enjoy it a little bit, I need to be careful lest I become one of THOSE people.
Anyway, I had had enough of forcing the employees of Autodesk to take the brunt of my anger that I gathered throughout this entire project (sorry guys), so once I got it all out of my system I tried it out. Also yes, I know that the suggestion is slightly uninformed in that I haven't actually tried the software yet, hush. I divided the photos into thirds, resulting in three 100x imagesets there were 15 left over, but I suppose a sacrifice must be made in the name of capitalism here. The plan is to stitch them together in Blender once I have all three models, but we'll see how it goes.
I loaded one third of my image set into ReCap, and have now been waiting 2+ hours for the project to get out of the "Waiting in Queue" at 1%. I looked this up too, and guess what? That's because of my licence status as well. All Educational users are lumped together into one big Queue, meaning that I'm going to have to wait for potentially thousands of other people's projects to finish up first before I get the chance to even see if it works or not.

I'm starting to get a little upset. I don't really think it's undue either. I truly feel like I'm going nowhere. I can't get a location, I can't make objects, and I can't even make a little test just to show everyone that I'm not barking up the wrong tree and that I do actually have a sound idea that is achievable. Literally all I need is a good location that works well and has 3D data about it stored on GMaps and a few photogrammetry objects, but it's feeling like the universe just really doesn't want me to finish this project. All of this is getting to be a bit much for me. I can still make the objects I suppose, but Meshroom seems to struggle with anything bigger than my tiny desk.
After a little break to clear my head, I decided to make a proof of concept just with random stuff. Random location, random items, it doesn't matter. At least once I know that things are doable all I'll have to do is swap things out where necessary and I'll have a piece. Something, anything, to show in my presentation tomorrow. I ended up taking a few locations that I scouted out in Milton Keynes (in Streetview again), just because I had the idea and it seems like the most viable option at the moment. I downloaded them using RenderDoc again, and set up the level like I did with my previous test.


Renders
Then, I went back to Meshroom and tried the garden image set again, but this time I divided it up into halves and tried a smaller image set. This time, it took a while but it worked a treat! I was blown away with the way that it looks, and once again I am incredibly impressed with how accurate it is at determining space and the difference in distance between each thing in the garden. Like all photogrammetry software, it struggled with complex shapes with a lot of space in them (ie: the chair or the rose bush that turned into a sinkhole), but I think that going back in with more photos of them will potentially sort that out.


Renders


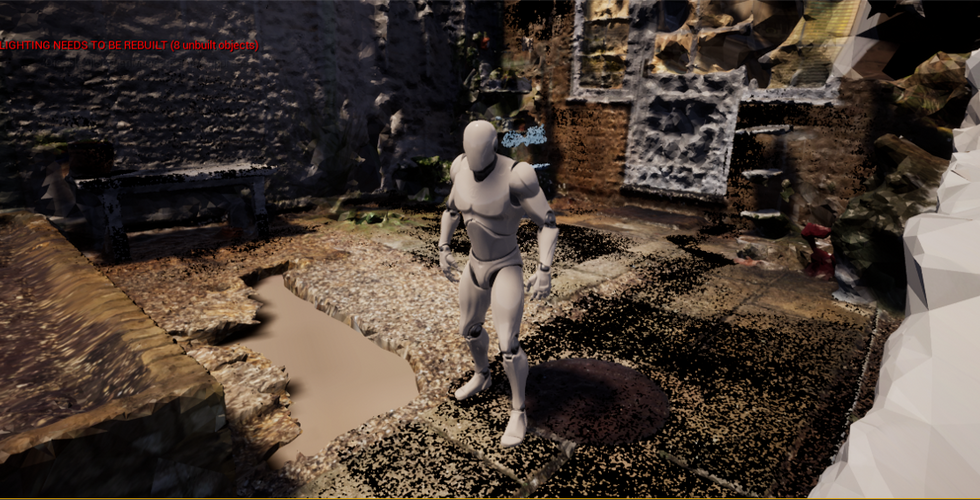


Back Garden Object Imported Into Area
After I imported it, I scaled it to be what felt similar to real life size and walked over to it using the default 3rd Person character model in Unreal to get a personal view that I couldn't get in the viewfinder of Dimension, and it felt so strange to "be in" my own garden but also to "be in" Milton Keynes at the same time. Not only that, to see everything wrapped in a low poly aesthetic got me in the mindset of being immersed in a story driven video game like Skyrim. I think that this was due to all the signifiers of the 3rd Person RPG is displayed in this demo - a vast explorable terrain with minute things to explore, while your perspective is lodged behind the character you possess. I fully expect this mindset to change once I employ the gameplay techniques of VR though. Whereas 3rd Person makes you feel as if you are a deity controlling a person/thing and having your thoughts actuated vicariously through them, VR/1st person removes the middle man entirely and puts you in the frontlines of the digital realm itself. VR does this far more effectively than just having a 1st person view on a monitor, as it utilises the entirety of your field of vision. It erases any chance of you getting sucked back into the real world because it removes it entirely. I think that unreal had a little trouble with figuring out how to apply lighting to this object since it's so complicated, so maybe reducing the Max Points from 1,000,000 to a lower number.
E P I L O G U E
So I have been told in a tutorial that I've been doing this whole thing wrong. It's totally my fault for forgetting a huge part of the brief, but I also think that being home for the 3rd lockdown in the UK and not really having a dialogue with my tutors is also part of the blame. Basically, in the project brief, it says that this unit is literally just research and development, and we continue with the actualisation in the next unit. What I had been doing is holding on to an idea of a final piece already, even though this unit is to help us come up with different strategies (methods) in order to push towards a final piece later. While this does mean that I have to throw away quite a bit of work and a lot of the problems I had with software messing up was completely pointless, but I'm glad that I have a direction to go towards now. I think that it's pretty clear by looking back that I have several different strategies that I want to use, but now I need to separate them from each other and remove the notion of a final piece all together, just leaving the methods I've been using and the reasons behind using them.
Strategy 1: Google Maps, Image Appropriation, Online Image Ownership.
Strategy 2: Using place to create and curate specific feelings in an audience.
Strategy 3: Using photogrammetry to take images and make them "objects". Also playing with indexicality and signifiers. Also using 3D Modelling, making my own objects and giving them the illusion of reality by using photographs as textures.
Strategy 4: Using VR Technology + game making software, utilising them to play with their ability to create immersion and how they can trick the brain into perceiving reality in simulated environments
I am a little worried because of the fact that I had an idea of what the final piece was going to be the whole time I was doing this project. I personally don't think that it's a bad thing at all, but my university course values evolution in ideas and they like to see a project form out of nebulous ideas rather than someone just working on a single idea. Since I know what I wanted to make from the beginning though, it's going to be difficult to think of something else using the strategies listed above. Each one on their own has a huge amount of potential to allow me to do many different things, but I feel that once I combine them there's only really one direction and it's the one I carved out since the beginning. I also have to write about each strategy (when I submit everything) and say how I could potentially explore these further in the second unit, but I feel as if I have done all the exploring that I need to do. I can always put what I plan to do and what I've done already, but that just seems like I'm not doing it properly. I truly seemed to have shot myself in the foot here. I think it's just because in every single photography project that I've done since A-Levels up until now, I've started out a project, explored ideas further, did research, and finished the project. This time though, we were asked to stop halfway and I just continued because it felt natural. I don't know if they're looking for changes at all in the next unit, and if they are then I'm concerned that I won't have many.
But, saying that, since the final piece comes next term, I think I'm done here! all I need to do now is compile everything into a submittable .zip and send everything over. Looking back, as much stress and anxiety this has all given me, I am super proud of myself for making the most ambitious art that I've ever made before. I have been learning so many new things in this beautiful world of digital and internet art and I'm excited to see where the next unit helps me take it.


Comments